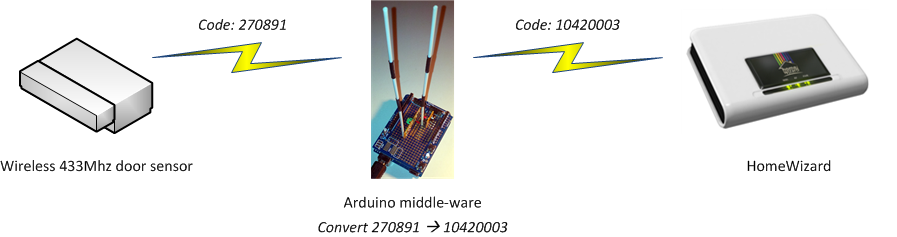
Convert cheap 433Mhz sensors to KaKu/CoCo with an Arduino convertor
In the past 1,5 year I have been playing a bit with Home Automation (or Domotics / Domotica) systems. I initially bought the HomeWizard, but was pretty disappointed in it. When the HomeWizard domotica system was introduced I expected a lot of it, sadly enough it has not been as great as I hoped and I am currently moving over to another system.  One of the things that annoyed me of the HomeWizard is the inability to add other sensors to the setup which were not part of the supported hardware (which is pretty limited). I moved to the HomeWizard from a different (alarm) system which contained a lot of 433Mhz sensors which I could not hook up to the HomeWizard. Because I did not want to throw all these sensors away I built a middle-ware system with an Arduino and some code which can convert the non-supported codes in to HomeWizard supported codes (KaKu / CoCo style codes). The middle-ware receives a code and then translates that to a code which can be understood by the HomeWizard. Initially designed for usage with HomeWizard this same approach also worked with HomeSeer, Domotiga and Domoticz, which all did not support my sensors directly (most of them because of the usage of the RFXCOM).
The approach described is shown in the overview below (the numbers used are just examples).
This post contains the schematic, code and all the info you need to build your own middle-ware. The described approach will work on the incompatible 433Mhz sensors of other (cheap) alarm systems, but also for ELRO remotes and probably a lot of other systems. It has been tested with the following devices:
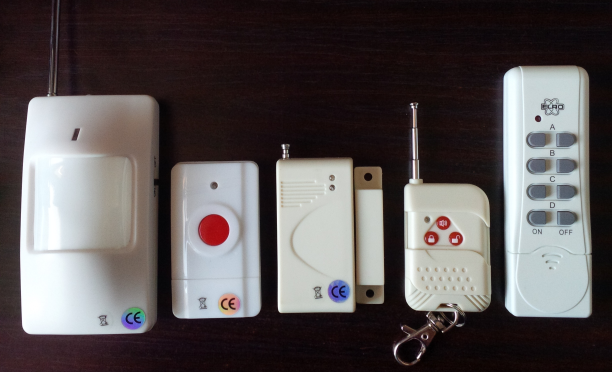
From left to right:
- Nameless motion sensor with  BX R433A and Semic CS5211DGO IBAU1K380BN chip
- Nameless button switch with  BX R433A and LP801B APN03535 chip
- Nameless door sensor with BX R433A and Semic CS5211AGP ICAU1K3T11JÂ chip
- Nameless remote with BX R433A and Semic CS5211AGP IBAU4K3807K chip
- ELRO AB440R (433.92Mhz) Remote
- Nameless 433Mhz smoke detector (not shown)
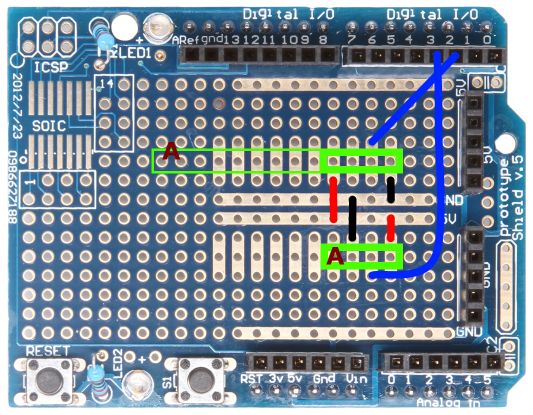
Arduino schematic
The hardware used for the middle-ware is a standard Arduino (or cheap alternative such as this), with an Arduino shield and a basic 433Mhz transmitter/receiver set. Any basic 433Mhz receiver and transmitter can be used for this, such as this pair on DealExtreme. The receiver module is the longer board of the two, the transmitter is the small one. The shield can of course also be replaced with a small breadboard, if that is what you prefer.
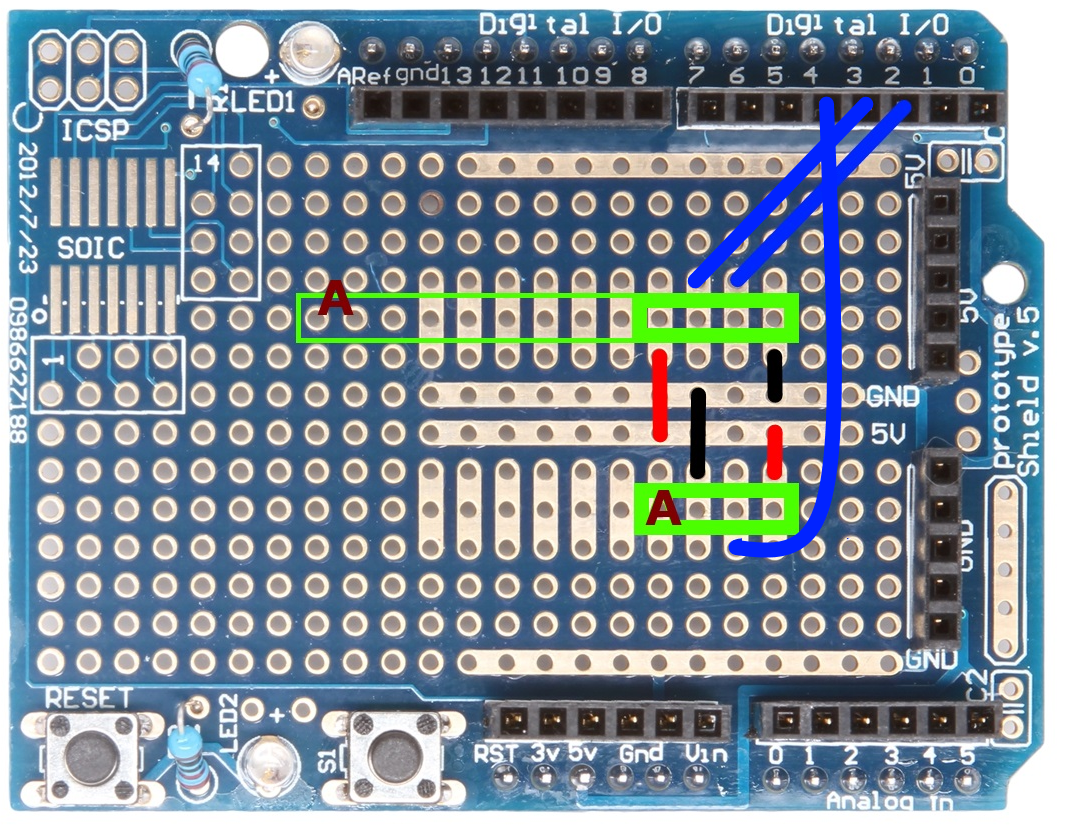
The following picture shows the setup of the Arduino and the 433Mhz sensors (green, receiver at the top, transmitter at the bottom), the red wires are the 5V wires, the black wires the GND wires and the blue wires the DATA wires. The antenna positions on the 433Mhz boards I used are shown by the A’s.
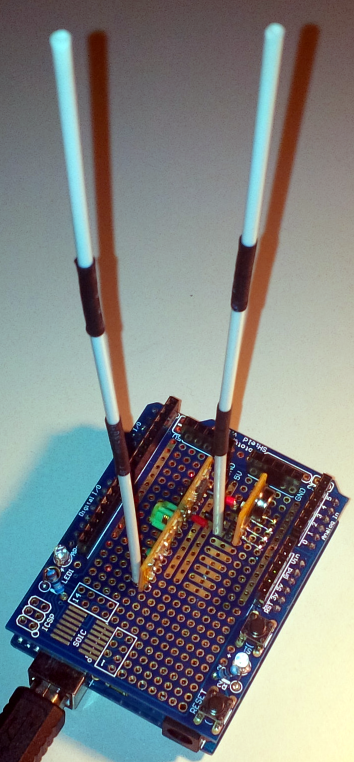
To extend the reach of the 433Mhz transmitter and receiver I added two antennas to the setup, made out of 16,7cm copper wire. I reinforced the antennas with the plastic part of cotton swabs (q-tips / wattenstaafjes (Dutch)) and some heat-shrink tubes, which worked out pretty well. The finished product can be seen below.
Code
The simplest code to run on the Arduino can be found below. This code makes use of two very nice Arduino libraries written by Randy Simons, it actually leans fully on those libraries and only links them together. Feel free to do whatever you want with the code below, only keep in mind the license of the libraries used. Any fixes or additions to the code are of course welcome, so please let me know if you have any.
// Cheap 443Mhz sensor to KaKu/CoCo convertor - simple
// Thijs Bosschert, 24-08-2014
// http://www.thice.nl

// Library: RemoteSwitch library v2.3.0 (20121229) for Arduino 1.0
//          Made by Randy Simons http://randysimons.nl/
//          https://github.com/hjgode/homewatch/tree/master/arduino/libraries/RemoteSwitch
#include <RemoteReceiver.h>
// Library: NewRemoteSwitch library v1.0.0 (20121229) for Arduino 1.0
//          Made by Randy Simons http://randysimons.nl/
//          https://github.com/hjgode/homewatch/tree/master/arduino/libraries/NewRemoteSwitch
#include <NewRemoteTransmitter.h>

void setup() {
  // Receiver, PIN 2 (0), only 1 received code is enough
  RemoteReceiver::init(0, 1, sendCodeNew);
}

void loop() {
}

void sendCodeNew(unsigned long receivedCode, unsigned int period) {
    // Disable receiver while sending
    RemoteReceiver::disable();
    // Send code
    NewRemoteTransmitter transmitter(receivedCode, 3, 260, 3);
    transmitter.sendGroup(1);
    // Enable Receiver again
    RemoteReceiver::enable();
}
This code sends out the same code it received, it is only converted to the other protocol. That way any 433Mhz device it picks up will be forwarded. This is the easiest way to add multiple 433 Mhz sensors to your setup. However, you can also choose to use the more advanced code below, which enables you to define your own codes and only forwards the codes it knows. This might be a solution you want when there is a lot of interference from other devices you do not want to have added to your system. This code below also has a debug option which shows you which 433Mhz codes are seen by the Arduino, which might be helpful to find the codes for all your devices.
// Cheap 443Mhz sensor to KaKu/CoCo convertor - advanced
// Thijs Bosschert, 24-08-2014
// http://www.thice.nl

// Library: RemoteSwitch library v2.3.0 (20121229) for Arduino 1.0
//          Made by Randy Simons http://randysimons.nl/
//          https://github.com/hjgode/homewatch/tree/master/arduino/libraries/RemoteSwitch
#include <RemoteReceiver.h>
// Library: NewRemoteSwitch library v1.0.0 (20121229) for Arduino 1.0
//          Made by Randy Simons http://randysimons.nl/
//          https://github.com/hjgode/homewatch/tree/master/arduino/libraries/NewRemoteSwitch
#include <NewRemoteTransmitter.h>

int debug = 1; // Turn debugging on (1) or off (0)
long int Code[30][2]; // Array to hold all the codes
int max = 30; // Maximum amount of codes, change if more needed

void setup() {
  // Only output information on the serial port when debugging is on
  if(debug) {
    Serial.begin(115200);
    Serial.println("DEBUG ON");
  }
  // Receiver, PIN 2 (0), only 1 received code is enough
  RemoteReceiver::init(0, 1, showCode);

  // Code examples, replace with your own code
  Code[0][0] = 270867;  Code[0][1]  = 10420001; // Will show up in Homewizard as: 009EFF2100
  Code[1][0] = 270873;  Code[1][1]  = 10420002; // Will show up in Homewizard as: 009EFF2200
  Code[2][0] = 270891;  Code[2][1]  = 10420003; // Will show up in Homewizard as: 009EFF2300
}

void loop() {
}

void showCode(unsigned long receivedCode, unsigned int period) {
  // Debug info: print the received code
  if(debug) {
    Serial.print("Code received:  ");
    Serial.println(receivedCode);
  }

  // Check if received code is in our list
  long int CoCoCode;
  for (int i = 0; i < max; i++) {
    if(Code[i][0] == receivedCode) {
      CoCoCode = Code[i][1];
      break;
    }
  }

  // If code is in our list, then send KaKu/CoCo code
  if (CoCoCode) {
    // Disable receiver while sending
    RemoteReceiver::disable();
    // Send code
    NewRemoteTransmitter transmitter(CoCoCode, 3, 252);
    transmitter.sendGroup(1);
    // Debug info: print the CoCo code
    if (debug) {
      Serial.print("Code sent:      ");
      Serial.println(CoCoCode);
    }
    // Enable Receiver again
    RemoteReceiver::enable();
    CoCoCode = 0;
  } else {
    // Do not send anything if code is unknown
    if (debug) {
      Serial.println("Code unknown");
    }
  }
}
Debug output
The debug option (int debug = 1;), from the code above gives the following debug information on the COM port:

Add to HomeWizard
Since the middle-ware is now sending out KaKu/CoCo codes that the HomeWizard can understand we can add them to the HomeWizard. Since we use a very simple protocol here we can at this moment only add the sensors as ‘Doorbells’, but that should not limit you in using the sensors.

 Add to Domoticz
When the Arduino middle-ware is being used the sensors will start showing up in Domoticz when the RFXCOM picks them up, they are shown as using protocol Lighting 2, AC.

When linked they will also show up in the log file (in this example they are linked to an event which sends out notifications using NMA).
Sun Aug 24 18:54:11 2014 Notification send (NMA)
Sun Aug 24 18:54:11 2014 UI Event triggered: Alarm Events - Test
Sun Aug 24 18:54:10 2014 (RFXCOM) Lighting 2 (Test Sensor)
Sun Aug 24 18:54:20 2014 Notification send (NMA)
Sun Aug 24 18:54:20 2014 UI Event triggered: Alarm Events - Test
Sun Aug 24 18:54:19 2014 (RFXCOM) Lighting 2 (Test Sensor)
Two way communication
After writing this How-To I decided to make a new version which could do two way communication. Which means you can use the Home Automation system to control your cheap 433Mhz receivers (such as ELRO power adapters) as well. This has been successfully tested on ELRO AB440SC (433.92Mhz) Wireless Switch Units.
The Arduino schematic for this Two-Way version is shown below, because the Arduino interupts 0 &Â 1 are on digital pins 2 & 3 we need to move the sender to digital pin 4. We hook up the same receiver to both PIN 2 and PIN 3 (both of the middle pins in the receiver are DATA).
The code for this version:
// Cheap 443Mhz sensor to KaKu/CoCo convertor - Two-Way
// Thijs Bosschert, 24-08-2014
// http://www.thice.nl

// Library: RemoteSwitch library v2.3.0 (20121229) for Arduino 1.0
//          Made by Randy Simons http://randysimons.nl/
//          https://github.com/hjgode/homewatch/tree/master/arduino/libraries/RemoteSwitch
#include <RemoteReceiver.h>
#include <RemoteTransmitter.h>
// Library: NewRemoteSwitch library v1.0.0 (20121229) for Arduino 1.0
//          Made by Randy Simons http://randysimons.nl/
//          https://github.com/hjgode/homewatch/tree/master/arduino/libraries/NewRemoteSwitch
#include <NewRemoteReceiver.h>
#include <NewRemoteTransmitter.h>

void setup() {
  // OldReceiver, PIN 2 (interupt 0), only 1 received code is enough
  RemoteReceiver::init(0, 1, sendCodeNew);
  // NewReceiver, PIN 3 (interupt 1), only 1 received code is enough
  NewRemoteReceiver::init(1, 1, sendCodeOld);
}

void loop() {
}

void sendCodeNew(unsigned long receivedCode, unsigned int period) {
    // Disable receiver while sending
    RemoteReceiver::disable();
    // Send code (on PIN4)
    NewRemoteTransmitter transmitter(receivedCode, 4, 260, 3);
    transmitter.sendGroup(1);
    // Enable Receiver again
    RemoteReceiver::enable();
}

void sendCodeOld(NewRemoteCode receivedCode) {
  // Disable the receiver while sending
  NewRemoteReceiver::disable();
  // Send code (on PIN4)
  RemoteTransmitter::sendCode(4, receivedCode.address, 260, 5);
  // Enable Receiver again
  NewRemoteReceiver::enable();
}
I hope this approach might be of use to someone. Please let me know if you have additions, remarks or comments. As last I would like to thank Randy Simons for his great library which enabled me to create this in a fairly simple way.
Leave a Reply