Repair a broken HP LaserJet printer by baking it

Categories Hardware, Mods

After my HP printer died just after his warranty period I searched for a solution what to do to revive it. When reported to HP they wanted to charge €350 to repair the printer, which is around the same amount a new printer would cost, besides that I had to ship to whole bulky printer to them. When searching the internet for an alternative you will find a lot of people with the same problem using this printer series but not a lot of clear solutions.

This write-up will describe a way to repair the HP LaserJet M1522 series printer. While this idea is not new I wanted to create an easy to follow overview to repair this printer instead of a “just bake the formatter board”. I hope this write-up will be handy for some of the people out there with the same problem. While this write-up is focusing on the HP LaserJet M1522 MFP printer I would expect the same approach to work on other faulty hardware.

The problem with the HP LaserJet M1522 printer series seems to be a faulty formatter board. Since this problem exists in a lot of units you would expect HP to take care of this and have their people informed about the problems with this unit. However when contacting HP they will quite likely have no idea what is wrong with the unit, at least that was my experience.

The symptoms of a faulty formatter board are among the following:

  • The printer seems to turn off completely out of itself
  • The printer hangs when booting up
  • The printer needs a couple of resets before it will boot correctly
  • The printer won’t turn on anymore at all

Usually the problems with the formatter board will get worse over time until the moment the printer won’t do anything at all anymore. The display of the printer will probably display the messages “Initializing…” and “Hewlett-Packard >>>>>” while is hanging during the boot cycle:


HP LaserJet M1522 MFP Fix 1


The problems with the formatter board seem to be caused by bad solder connections, so the way we are going to fix this is by ‘baking’ the formatter board. This write-up will take you through the steps you need to take to fix the printer by baking the formatter board. The only downside to this approach is that this fix only lasted for 6 months for me after which I had to bake the formatter board again.


DISCLAIMER: This write-up is just for your information, I am not responsible for what you do with your printer. Keep in mind that this is Fringe-IT and that in doubt you should just buy a new printer and leave projects like this to people who have an idea about what they are doing.


Instructions


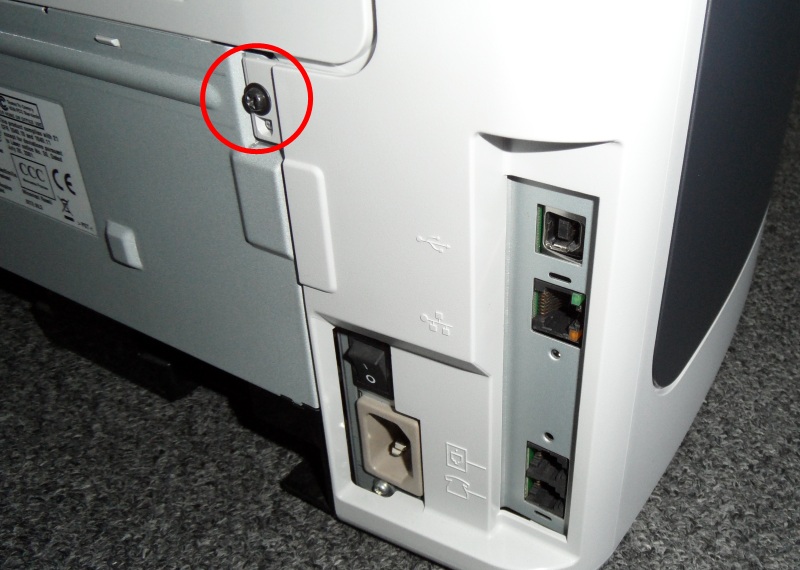
Find the screw located at the right side of the back of the printer as shown in the picture below. This screw is the only one we need to unscrew to be able to take the left side of the printer off, so lets remove it.


HP LaserJet M1522 MFP Fix 2


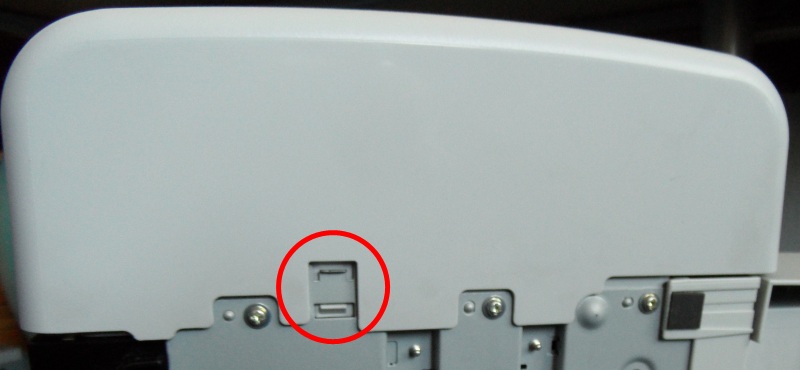
After removing the screw we can pop open the side panel, however there is a small latch at the bottom of the printer which you need to press for an easy release. See the picture below for the small latch.


HP LaserJet M1522 MFP Fix 3


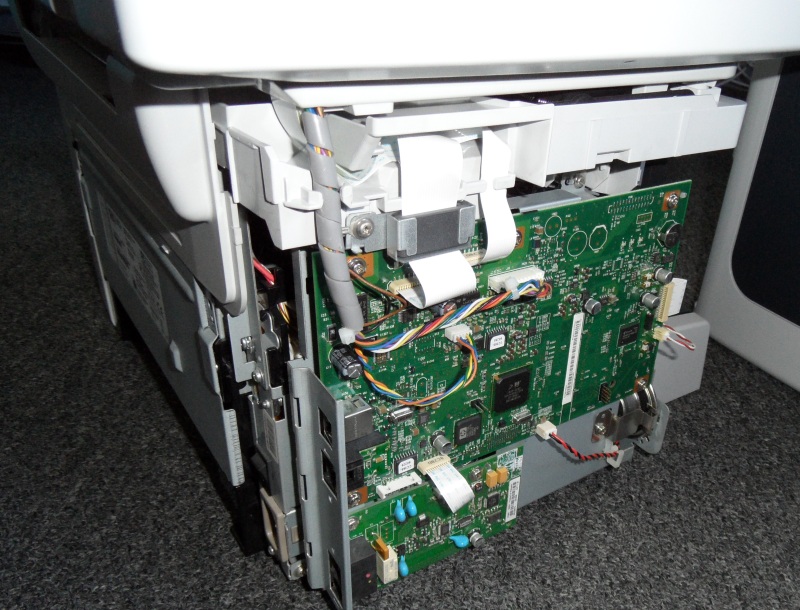
After popping off the side panel we can already see the fomatter board, we see two boards and the bigger one on top is the formatter:


HP LaserJet M1522 MFP Fix 4


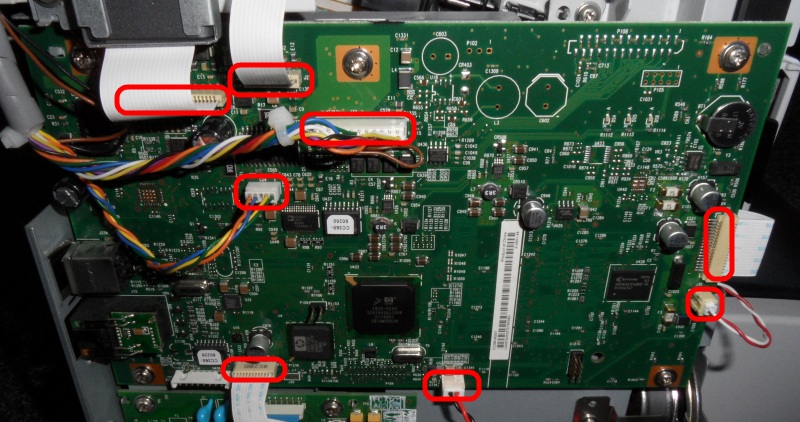
Since we need to work on this formatter we will have to get it disconnected from the rest of the printer. The first thing to do is to disconnect all the ribbons and connectors shown in the picture below.


HP LaserJet M1522 MFP Fix 5


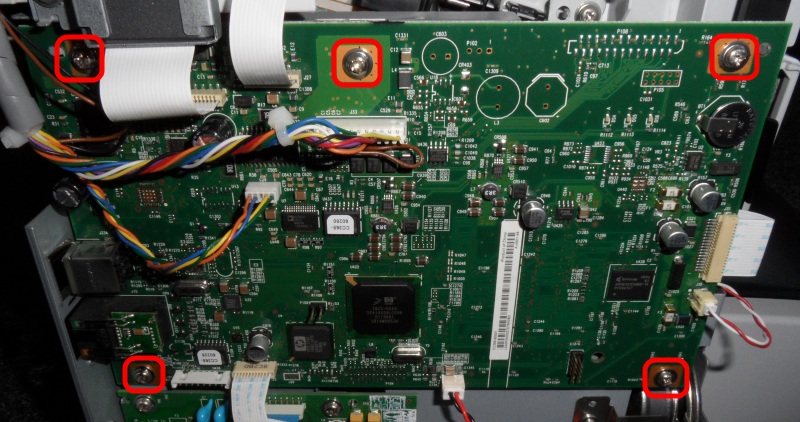
After disconnecting all connections from above it is time to remove the five screws holding the formatter board in its place:


HP LaserJet M1522 MFP Fix 6


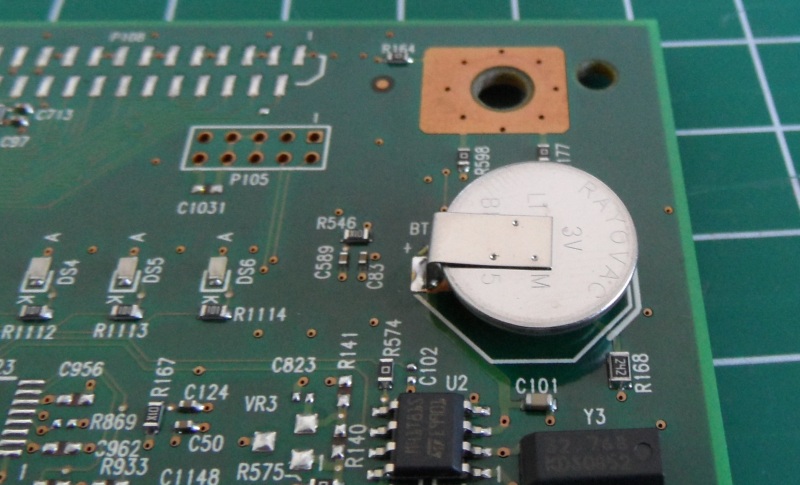
After removing the 5 screws the formatter board can easily be taken out of the printer. Before we can bake the formatter board we should remove the on-board battery from it. It is quite likely the battery won’t take the heat from the baking so well. The battery is located in the top right corner of the formatter board as can be seen below. Pay attention to its orientation, you probably do not want to connect it back the wrong way around.


HP LaserJet M1522 MFP Fix 7


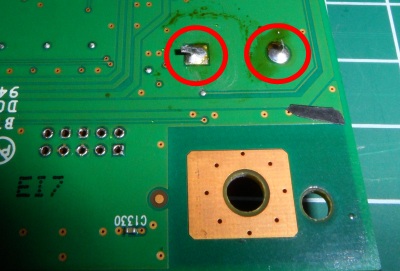
When turning the formatter board over you can see the two solder connections of the battery. The easiest way to desolder the battery is by heating the solder and sucking it away with a solder sucker.


HP LaserJet M1522 MFP Fix 8


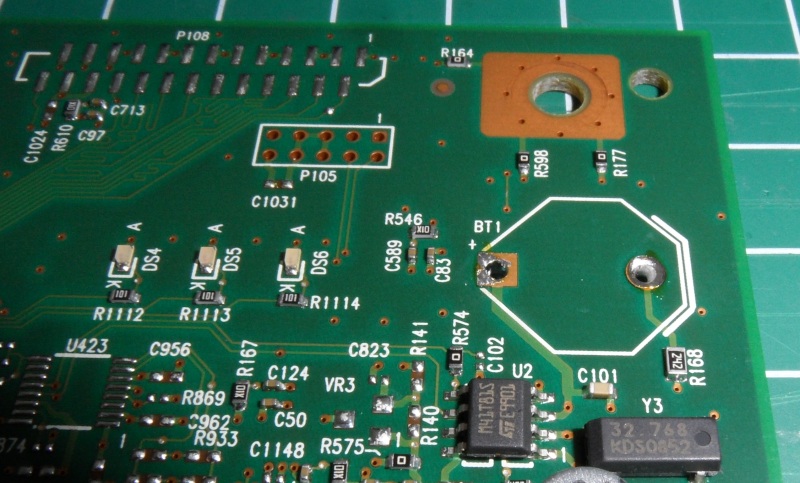
After removing the battery the board is almost ready to be put in to the oven.


HP LaserJet M1522 MFP Fix 8b


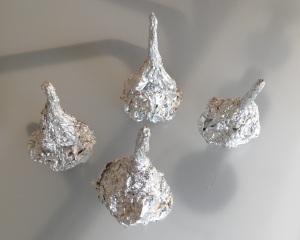
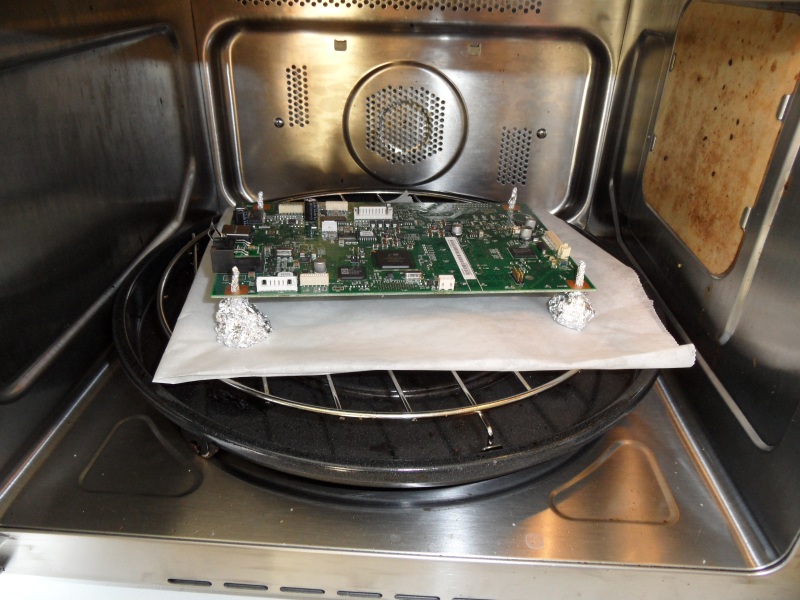
Because we don’t want to have the formatter board touching any part of the oven we will create some small stands for it to stand on. The easiest way to do this is to get some tinfoil and create small stands like shown on the picture below.


HP LaserJet M1522 MFP Fix 9


The tinfoil stands are pushed through the holes of the screws of the formatter board and after this the board is ready to be put inside the oven.


HP LaserJet M1522 MFP Fix 10


Make sure that the formatter board is not touching any part of the oven, this might cause overheating or melting certain parts of the formatter board.


HP LaserJet M1522 MFP Fix 11


We should pre-heat the oven on 180 degrees Celsius (about 350 degrees Fahrenheit) 200 degrees Celsius (about 400 degrees Fahrenheit) Update: Julius Rahmandar commented that the temperature should be a bit higher (from 180°C to 200°C) and this indeed seems to work a bit better. After popping the formatter board in the oven it is time to ‘bake’ it for 8 minutes (also on 200 degrees Celsius). Of course instead of baking the board you could probably also pop it in to the microwave for a short moment, but I would advise against that 😉

After these 8 minutes we should let the formatter board cool down for a while, be warned that the formatter board will be quite hot. After the formatter board has cooled down it is time to read this write-up backwards and follow all the steps to put the printer back together. So, remove the tinfoil stands, solder back the battery, screw the formatter board back in to the printer, reconnect all the wires and ribbons and put the casing back.

Turn on your printer and if you are lucky it should be working again!


Some of the sources I used and more information:

The official formatter board part number is: CC368-60001

A guide for the HP LaserJet P2015dn: https://www.xltoolbox.net/blog/2013/11/fixing-laserjet-network-connectivity.html

Update 2016: The fix only works for a couple of months before you have to bake the formatter board again. During my last re-bake of the formatter board I encountered a different error, which I thought was linked to the formatter board issue (but was not). The printer would only show “install black cartridge” even though it was present in the printer. The printer further would make a different sound while starting up (it would not make one of the first “rolling sounds” when booting). After fumbling around with the cartridge for a while I found out that there simply was some paper stuck in the printer, after removing this piece of paper the whole issue was gone. Since I found that multiple people encountered the exact same issue I decided to add that info here as well. I guess the confusing “install black cartridge” error is shown instead of a normal paper-jam error message.

 

118 Comments

  • Baking an HP LaserJet 1522 Series back to life | ro-Stire
    20/10/2011

    […] [Thice] had himself a problem. As luck would have it his HP laser printer died shortly after the warranty period expired, and HP was ready to charge him €350 to repair it. Since that would pretty much buy [Thice] a new one, he decided to try fixing the problem himself. He scoured the Internet for a solution to his problem, and luckily discovered that his printer might be recoverable. […]

  • Baking an HP LaserJet 1522 Series back to life | The Depot of Talk
    20/10/2011

    […] [Thice] had himself a problem. As luck would have it his HP laser printer died shortly after the warranty period expired, and HP was ready to charge him €350 to repair it. Since that would pretty much buy [Thice] a new one, he decided to try fixing the problem himself. He scoured the Internet for a solution to his problem, and luckily discovered that his printer might be recoverable. […]

  • Julius Rahmandar
    12/11/2011

    Thys, I did something similar to my MacBookPro logic board that failed to boot up all the way. MBPs built during 2007/2008 have NVIDIA graphic BGA chip and the solder joint would fail after 2-3 years. I think the reason yours failed again after 6 month is that you did not get the temperature high enough. According to Altera (google BGA reflow), the ideal reflow temperature is 200°C or around 400°F. Just a thought.

    On another subject, I am trying to modify my Altec Lansing inMotion Mini so that it will charge an iPhone when docked. This Mini only provides firewire charging thus my iPhone would say “charging not supported”. I am thinking of adding a 7805 chip with filter caps Using the 12v input as a source, but am not sure on how to make the iPhone accept it. I believe there is other signaling pins that needs to be added to make it work. Do yiou have any idea how to hack it? Thanks. Julius

  • Julius Rahmandar
    12/11/2011

    Oh, BTW I do not recommend using microwave to heat the board. Metal arc’ing and possibly excessive microwave energy may cause IC failures. Don’t do it.

  • Thice
    13/11/2011

    @Julius Rahmandar
    Great reply, thanks! When my printer breaks down again I will up the temperature to see how that works out.

    On the iPhone, you might want to check out this information: http://www.ladyada.net/make/mintyboost/icharge.html
    Let me know if that works for you.

  • Than
    30/01/2012

    It works ! thankyou

  • Al
    19/02/2012

    Followed the steps and it worked! Thank you!!!

  • t
    13/03/2012

    It works amazing!

  • Bob
    15/04/2012

    You helped me fix my HP M1522 printer. I never could have done it without your excellent pictures.
    Thank You

  • GadgetCT
    26/04/2012

    I have follow your instruction. My printer is working now and thank you so much. almost buying a new printer.

  • Brian
    10/05/2012

    Holy crap… it worked! Our HP M1522nf printer in the office has been freezing up within 10 minutes after each reboot. And when it froze, nothing works: printing, photocopy, scanning. It’s been a real nightmare at the office and we were going to squeeze our budget to get a new one until we tried this out. Bake your board… it works!

  • Mike
    17/05/2012

    Excellent instructions! The best and easiest I’ve ever seen.

    Unfortunately, this fix didn’t work for me so I think my printer is toast. I’ve had so many problems with this HP device, including a warranty repair that required my printer being replaced by a refurbished model, that I’ll probably never again buy a HP.

  • Luigi
    31/05/2012

    Tried with mine, the two capacitors popped in the oven, resulting in a lot of mess-up with the smd components

  • Thice
    04/06/2012

    @Luigi
    This is the first time I heard someone had this issue. At what temperature did you bake the board?

  • Matthias
    08/07/2012

    Hey all. Does anyone know if baking the formatter board also helps solving “scan error #5”? Or is this a scan module related problem? I have read different stuff in the web: might be sensor problems, might also be a light intensity problem – the printer/scanner is about 2 years old. Thanks for the provided info.
    Cheers

  • Thice
    18/07/2012

    @Matthias
    I don’t expect that this error is related to the formatter board, but I do not know for sure.

  • JimmyB
    28/07/2012

    Figured i`d give this a try and low and behold , my printer is back online and running smooth!! Thanx for all the advise and for this handy fix!!

  • Trevor
    31/07/2012

    Wow that was amazing, thank you so much for the fool proof guide. I had all of the symptoms mentioned above.

  • Dekel
    06/08/2012

    Wooooow this is amazing! iTs workes well.

  • Ekkatos
    08/08/2012

    This is awesome man ! , my printer become alive again after have been dead so many months.
    The instruction that you provide is not hard to follow and the result was right on the bull sign.
    Again thanks much for this intel and now I can print some home works for my two little kids.

    Best regards

  • MAILA
    15/08/2012

    STILL GOING TO TRY IT OUT. BRB WITH THE RESULT.

  • Raul
    21/08/2012

    @Julius Rahmandar
    This is a great article on how to bake the board. I’m just wondering if you know about possible solutions for other similar Laserjet M 1522 nf problems. I’ve searched all over and found nothing. Mine is now self-initializing itself periodically.

    Have a Laserjet M 1522 nf connected to a Dell with Windows XP Media Center. Laserjet working fine until I replaced a non-hp toner with another non-HP toner. Then, got supply error message on the Laserjet display and once I pressed OK , it would work for a while and then repeat itself. I have user non-HP toners most of time I had the Laserjet, without any problem until now.

    Searching for solutions on the internet, ran accross the suggestion of updating the firmware may take care of this problem so did it at the HP website.

    Then it started self-initializing periodically . The time lapsed bet. events was not the same, 5 min , then 10, then back to 5. Then I rebooted the pc and it changed to longer periods of time, into 1 1/2 hours bet. events.

    Once in a while, the self-initialization would freeze at the HP name on the Laserjet display and once I shut it down, goes back to Ready, so far. I’ve thought about downloading the firmware update again as it may have been a bad download. It may be just be wishful thinking

    I would really appreciate any assistance on this matter.

    ..

  • Thice
    21/08/2012

    @Raul
    The last part of your description pretty much sounds like the formatter board acting up.

  • Raul
    08/09/2012

    @Thice
    I think you are right. Now, it is stuck on the name Hewlett Pack….. and it won’t go to “Ready”. It is shot!!

    I do not have the equipment to desolder and resolder the battery, nor do I know how to do it. I realize that the battery needs to come out which is simple to do, but I can “bake it ” without removing the solder ??

    I’m also wondering if this is a recurring problem. Somewhere I saw that this may be needed every 6 month ?? Any comments on it?

  • Thice
    11/09/2012

    @Raul
    You need to remove the battery and place it back after the ‘baking’, the solder that holds the battery does not need to be removed.

    The fix will hold for a while, but eventually the printer will brake down again, however, re-baking it works fine then. I got better results after switching to 200 degrees Celsius (about 400 degrees Fahrenheit).

  • andrew nrg
    28/09/2012

    It works fine!! thank you very much
    HP assistance didn’t know the problem and wanted 250.00 € to fix it; just like a new printer…..

  • Alex
    10/10/2012

    It really works! I’cant believe it 😉

    Thank you!

  • Delray
    25/10/2012

    Yes, baking the formatter card restored functionality for me as well, but I did *not* remove the battery before baking, as several said they found it an unnecessary step. (I did not have a solder iron on hand for the job and I had to get the unit on-line again quickly). Turns out my formatter board battery split from the heat. I would remove it if you can.

  • JJaaa
    31/10/2012

    Trying it now….

  • John Silver
    13/11/2012

    My battery split apart in the oven. Do you know the purpose of the battery? Will the printer function without the battery? Thank You

  • Thice
    13/11/2012

    @John Silver
    I actually do not know, I never looked in to what the battery does. See if it works without the battery (you probably want to remove it completely) and report back please 😉

  • Drew Pips
    05/12/2012

    Hi, I am immensely grateful for this info! I baked the controller card
    as per the instructions here and my printer was detected for the first
    time via Network. Previously it only detected intermittently off, then
    on, etc. via USB. Test page just printed.

    Previously the installation always failed because the printer failed
    within minutes and during the software install. Yes, it appeared the
    power to the controller card was simply going off, as the front display
    would be blank, and the network plug light would be off.

    By the way, a little piece of flux core solder and a cheap 40W soldering
    iron was all that’s needed to R&R the battery. No need to suck/clean the
    old solder away since merely re-heating the hole lets you poke the battery’s
    solder tabs through during replacement. Then just touch up the poked-through
    tabs with some fresh new solder and it’s done.

    Thanks again

  • MARC G
    03/01/2013

    Thank you so much….worked like a charm. amazing

  • scotty
    22/01/2013

    Your solution was my last resort! I took my printer to the HP depot here in Costa Rica just before it went out of warranty. It turned off after about 5 seconds. They replaced the Formatter Board. The printer never did behave correctly and failed again after a few days. It sat collecting dust for months until I decided to recycle it. Being rather tenacious I thought that I’d try Googling one more time and found your posting.
    Brilliant!
    Being in the electronics industry for over 35 years the solution immediately made sense.
    The entire process took about a half an hour (only because I had a bit of trouble removing my cover).
    The printer booted perfectly, Win 7 installed it automatically and I am now in business!

    Thank you so much!

    Scotty in Costa Rica

  • Matthew N
    01/02/2013

    Same here.
    I put it in the oven on bake for 8 mins at 190.
    result – printer now working.

    I am thankful for the saving, and am wondering, why when i lodged a call to HP that they said that only a qualified service technician could perform the logic board update..
    The only setting that seems to have been lost in the date/time when i removed the battery.

    Other than that, as soon as i re-connected the printer to the network, docs started spooling.
    awesome thanks.

  • Jonathan
    06/02/2013

    Holy crap, it worked!!!

    Now all I have to do is send back the printer that just came that I ordered.

  • sergio
    16/02/2013

    thank u so much it works perfectly, i take my precautions, i only pre heat till 395 farenheid and 7 min in to the oven,,,… !!!

  • Mike B
    23/02/2013

    Well, not sure how long it will work, but after running the process the printer fired right up. Thanks for putting together a terrific set of instructions. I have two convection ovens so I set one on 250F and one at 400F. Then I preheated the board for 1 minute at 250F then moved it into 400F for 7 minutes, then back into 250F for another minute. This is the best I could do to pre-heat – reflow – cool down the board. We’ll see how it goes. If you ever come to Southern California I owe you a glass of wine!

  • CMK
    03/04/2013

    HP replaced the board twice under warranty – I bought a new printer and needed the scanner from this so tried this fix. Worked 100% as expected. NOTE: if the capacitors swell towards the end of the baking dont worry – they will shrink back once cooled.
    Thanks for the help.

  • Gins
    15/04/2013

    One of the things I love about the internet is the ability to find any recipe that you want. Not as tasty as most, but very satisfying. Difficulty was harder than spanish omelette, easier than meringues. My previously misbehaving printer has been working fine today, thank you very much for taking the time to help.

  • Claus
    15/04/2013

    I confirm it works! 200 C for 8 mins. Mine had no battery (I guess the battery is for the printer with a fax).
    To “pop off” the side panel was a little challenge. Otherwise it can be done in 8 mins baking + 20 mins cooling + 5 mins mounting/unmounting.

    Thanks a lot for your clear description and for the fun to succeed with the reparation.

    Claus (Sweden)

  • Phi Ho
    20/04/2013

    Thank you. Bought HP M1522nf on Craiglist. Brought home, on for 1 minute and auto shut down. For this instruction, gave it a shot. It works like a champ. Thanks alot

  • Philip Newell (France)
    14/05/2013

    Thank you so much for this detailed tutorial. You saved us buying a new printer! After baking the card as instructed, as soon as I reconnected the printer, the documents trapped in the spool came out instantly. It’s still working perfectly after 24 hrs – opposed to merely 5 minutes before the baking process! Wonderful!

  • Chris Stratton
    27/05/2013

    I did this and it worked. Printer’s working like a charm. Thank you so much for these detailed instructions. I had to tailor them a bit for my 2727 nf, but boy was I pleased when it booted up and printed just fine after cooldown.

    My only failure – I had a helluva time getting the battery off and, deciding that it was only useful for faxes, which I don’t use the machine for any more, I gave up on detaching it, hoping it would survive the heat. No such luck – it broke open – but it’s not a big deal.

    The one question I’d put to the OP or to others – can you kindly give more detail on how to remove the battery and, after the bake, reattach it? I am neither techie nor gearhead, so the passing reference in the article to soldering equipment was meaningless to me. More detail on this might help other less technically oriented people save their batteries, and it might help me figure out how to detach my broken battery and replace it. Thank you so much again! 🙂

    Most importantly, though, my printer works! T

  • Thice
    04/06/2013

    @Chris Stratton
    Hi Chris, please check here for more info on desoldering: https://en.wikipedia.org/wiki/Desoldering

  • Christian Laurila
    12/06/2013

    I tried it, but unfortinatly I followed the “flash firmware first” which I did, and then it frooze due to bad motherboard. I baked the board, worked good except that blown battery. installed it anyways, now its stuck at

    Hewlett-Packard
    >> >>

    And I cant get it into Ready mode to reflash, or do anything.

    Does anyone have any suggestions how to fix the bad firmware? Any switches somewhere? Tried reboot by holding arrow down and cancel, did nothing at all.

  • Bruce
    13/06/2013

    Unbelievable, it worked! I set oven @ 390 degrees farenheit. Thank you. This post saved me a few hundred bucks!

  • Will Roper
    22/06/2013

    Thanks, this is too cool, it’s working just fine now!

  • Nenad SEBIA !!!
    17/07/2013

    REALY WORKS THANKS !!! 😀

  • claudio
    07/08/2013

    EXTRAORDINARIO MILLE VOLTE GRAZIE!!!!!!!!!!!!!!!!!!

Leave a Reply

Your email address will not be published. Required fields are marked *