Repair a broken HP LaserJet printer by baking it

Categories Hardware, Mods

After my HP printer died just after his warranty period I searched for a solution what to do to revive it. When reported to HP they wanted to charge €350 to repair the printer, which is around the same amount a new printer would cost, besides that I had to ship to whole bulky printer to them. When searching the internet for an alternative you will find a lot of people with the same problem using this printer series but not a lot of clear solutions.

This write-up will describe a way to repair the HP LaserJet M1522 series printer. While this idea is not new I wanted to create an easy to follow overview to repair this printer instead of a “just bake the formatter board”. I hope this write-up will be handy for some of the people out there with the same problem. While this write-up is focusing on the HP LaserJet M1522 MFP printer I would expect the same approach to work on other faulty hardware.

The problem with the HP LaserJet M1522 printer series seems to be a faulty formatter board. Since this problem exists in a lot of units you would expect HP to take care of this and have their people informed about the problems with this unit. However when contacting HP they will quite likely have no idea what is wrong with the unit, at least that was my experience.

The symptoms of a faulty formatter board are among the following:

  • The printer seems to turn off completely out of itself
  • The printer hangs when booting up
  • The printer needs a couple of resets before it will boot correctly
  • The printer won’t turn on anymore at all

Usually the problems with the formatter board will get worse over time until the moment the printer won’t do anything at all anymore. The display of the printer will probably display the messages “Initializing…” and “Hewlett-Packard >>>>>” while is hanging during the boot cycle:


HP LaserJet M1522 MFP Fix 1


The problems with the formatter board seem to be caused by bad solder connections, so the way we are going to fix this is by ‘baking’ the formatter board. This write-up will take you through the steps you need to take to fix the printer by baking the formatter board. The only downside to this approach is that this fix only lasted for 6 months for me after which I had to bake the formatter board again.


DISCLAIMER: This write-up is just for your information, I am not responsible for what you do with your printer. Keep in mind that this is Fringe-IT and that in doubt you should just buy a new printer and leave projects like this to people who have an idea about what they are doing.


Instructions


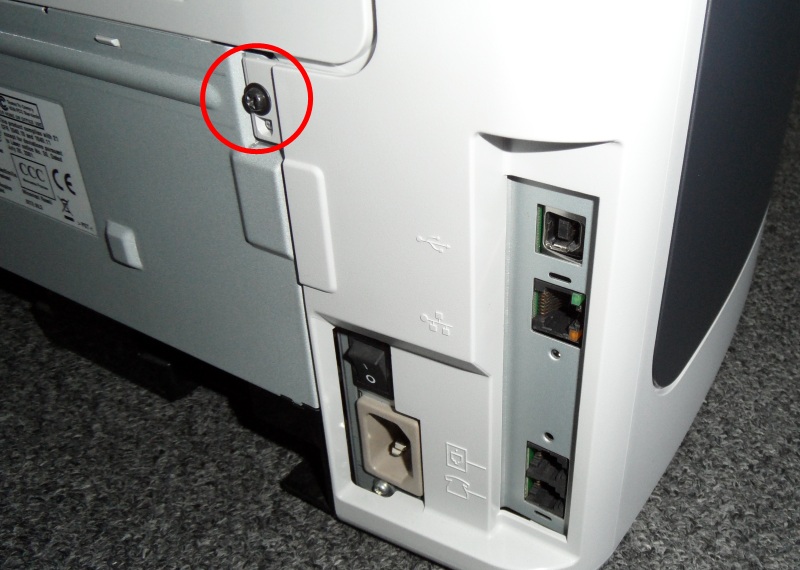
Find the screw located at the right side of the back of the printer as shown in the picture below. This screw is the only one we need to unscrew to be able to take the left side of the printer off, so lets remove it.


HP LaserJet M1522 MFP Fix 2


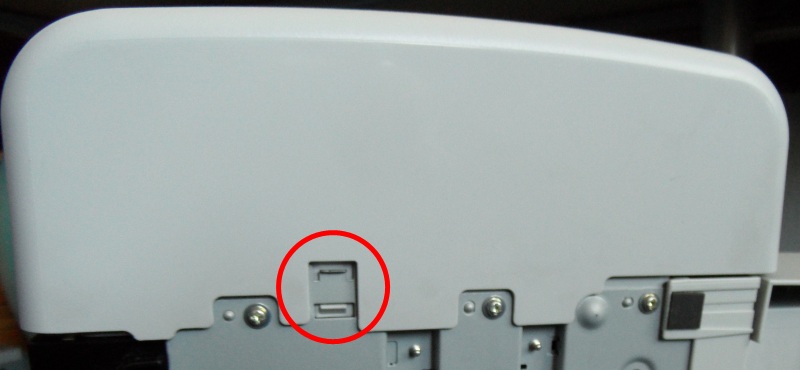
After removing the screw we can pop open the side panel, however there is a small latch at the bottom of the printer which you need to press for an easy release. See the picture below for the small latch.


HP LaserJet M1522 MFP Fix 3


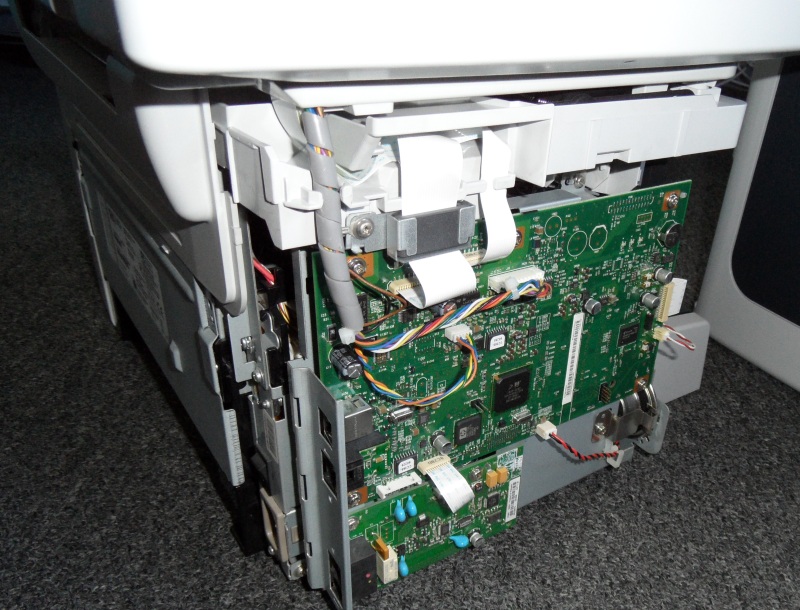
After popping off the side panel we can already see the fomatter board, we see two boards and the bigger one on top is the formatter:


HP LaserJet M1522 MFP Fix 4


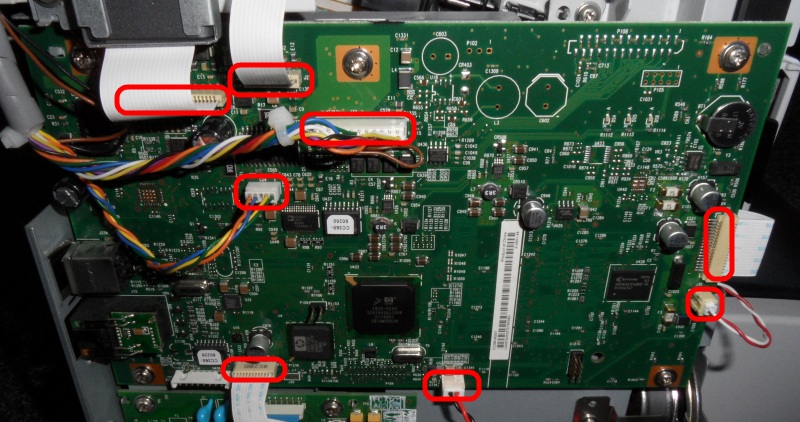
Since we need to work on this formatter we will have to get it disconnected from the rest of the printer. The first thing to do is to disconnect all the ribbons and connectors shown in the picture below.


HP LaserJet M1522 MFP Fix 5


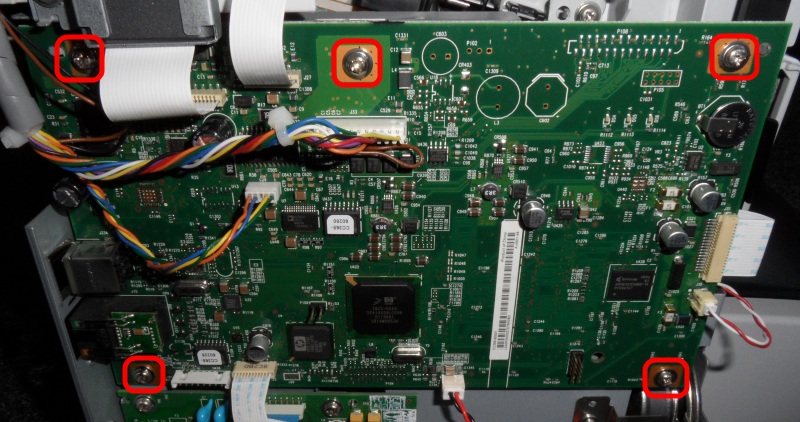
After disconnecting all connections from above it is time to remove the five screws holding the formatter board in its place:


HP LaserJet M1522 MFP Fix 6


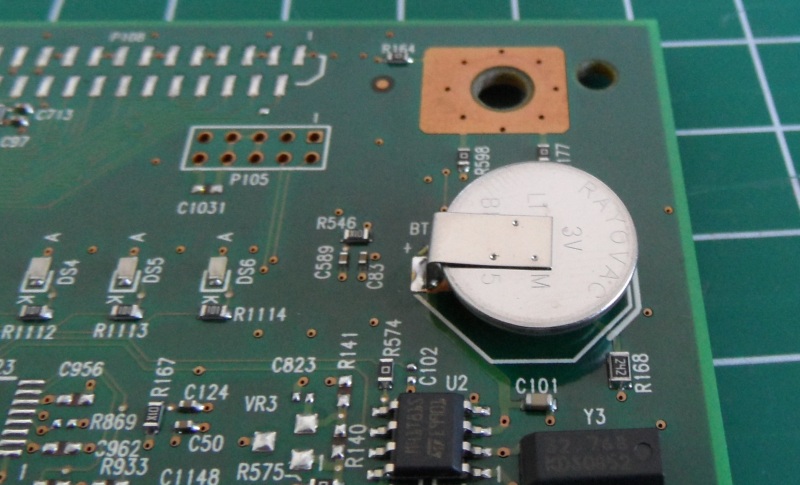
After removing the 5 screws the formatter board can easily be taken out of the printer. Before we can bake the formatter board we should remove the on-board battery from it. It is quite likely the battery won’t take the heat from the baking so well. The battery is located in the top right corner of the formatter board as can be seen below. Pay attention to its orientation, you probably do not want to connect it back the wrong way around.


HP LaserJet M1522 MFP Fix 7


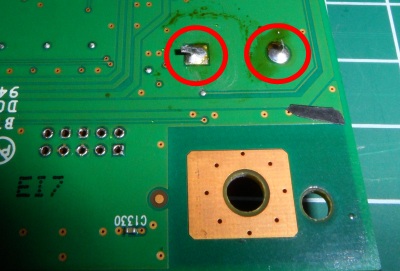
When turning the formatter board over you can see the two solder connections of the battery. The easiest way to desolder the battery is by heating the solder and sucking it away with a solder sucker.


HP LaserJet M1522 MFP Fix 8


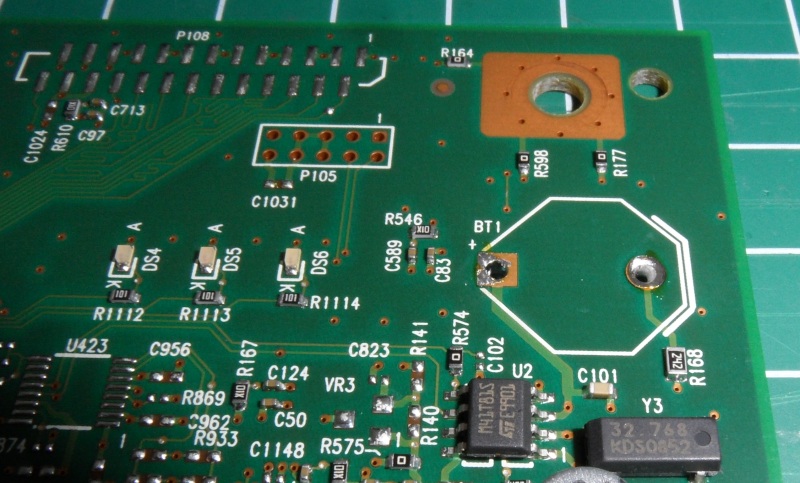
After removing the battery the board is almost ready to be put in to the oven.


HP LaserJet M1522 MFP Fix 8b


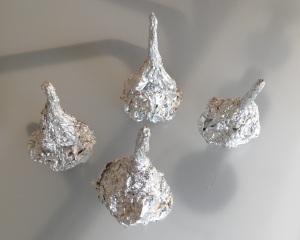
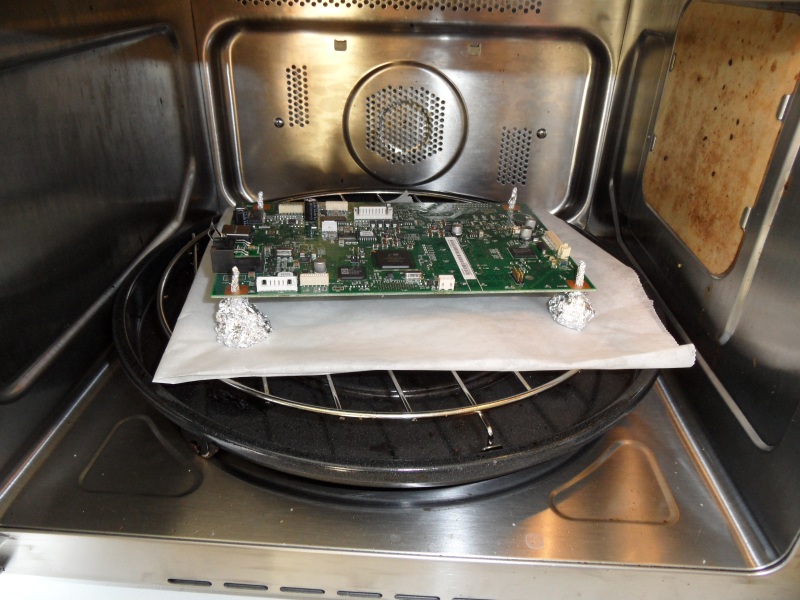
Because we don’t want to have the formatter board touching any part of the oven we will create some small stands for it to stand on. The easiest way to do this is to get some tinfoil and create small stands like shown on the picture below.


HP LaserJet M1522 MFP Fix 9


The tinfoil stands are pushed through the holes of the screws of the formatter board and after this the board is ready to be put inside the oven.


HP LaserJet M1522 MFP Fix 10


Make sure that the formatter board is not touching any part of the oven, this might cause overheating or melting certain parts of the formatter board.


HP LaserJet M1522 MFP Fix 11


We should pre-heat the oven on 180 degrees Celsius (about 350 degrees Fahrenheit) 200 degrees Celsius (about 400 degrees Fahrenheit) Update: Julius Rahmandar commented that the temperature should be a bit higher (from 180°C to 200°C) and this indeed seems to work a bit better. After popping the formatter board in the oven it is time to ‘bake’ it for 8 minutes (also on 200 degrees Celsius). Of course instead of baking the board you could probably also pop it in to the microwave for a short moment, but I would advise against that 😉

After these 8 minutes we should let the formatter board cool down for a while, be warned that the formatter board will be quite hot. After the formatter board has cooled down it is time to read this write-up backwards and follow all the steps to put the printer back together. So, remove the tinfoil stands, solder back the battery, screw the formatter board back in to the printer, reconnect all the wires and ribbons and put the casing back.

Turn on your printer and if you are lucky it should be working again!


Some of the sources I used and more information:

The official formatter board part number is: CC368-60001

A guide for the HP LaserJet P2015dn: https://www.xltoolbox.net/blog/2013/11/fixing-laserjet-network-connectivity.html

Update 2016: The fix only works for a couple of months before you have to bake the formatter board again. During my last re-bake of the formatter board I encountered a different error, which I thought was linked to the formatter board issue (but was not). The printer would only show “install black cartridge” even though it was present in the printer. The printer further would make a different sound while starting up (it would not make one of the first “rolling sounds” when booting). After fumbling around with the cartridge for a while I found out that there simply was some paper stuck in the printer, after removing this piece of paper the whole issue was gone. Since I found that multiple people encountered the exact same issue I decided to add that info here as well. I guess the confusing “install black cartridge” error is shown instead of a normal paper-jam error message.

 

118 Comments

  • Tom
    10/08/2013

    bro i got the exact same problem as yours so i if u know a fix for it please let me know….!!!@Christian Laurila

  • AL
    10/08/2013

    I have not had to do this yet but JUST A NOTE ON DE-SOLDERING. You can buy an expensive soldering pencil (also called iron) at Radio Shack for $15 or so. You want a 15 or 20 watt unit, certainly no more than 30 watts. Also but the smallest quantity of rosin-core solder that they have available. Before you go to work on your board, plug in the soldering iron and let it heat up. Rest it on a piece of wood or something so that the tip does not touch anything–it will char wood and burn paper! In 4 or 5 min it will be hot enough to

    1) sizzle a drop of water on the work-table (that’s my test) and melt some solder on the tip–this is called tinning the tip and must be done before you use the iron. Then

    2) slowly melt some solder with the iron, just to get a feel. If you have some electrical hook-up wire, splice 2 pieces together and solder the joint. Let it cool a bit then heat it again to see how the solder heats up and liquefies. Next

    3) Go to work. You’ll need a hot soldering iron and something to push the batter with, a small screwdriver, small needlenose pliers, hemostat or whatever. Heat one of the battery’s terminals just enough to melt the solder. As soon as it is just melted, try to lift up the battery-push the screwdriver under it and lever it up, or whatever. When the heat is removed, the solder will go solid again. Hopefully one battery terminal is loose or at least looser. Next do the other terminal. If, you are lucky, you only need to do each terminal once. If you are unlucky, it will be back and forth for a bit.

    4) When the battery is out, the holes it came from will probably be filled with solder. Don’t worry about this.

    5) The trip to the oven will melt the solder in these holes and, with luck again they may stay open. If not, when you go to replace the battery, heating the solder will let you reinsert the battery leads. OR before you replace the battery, you could remove the solder:

    6) You’ll need some STRANDED copper wire, usually sold at Radio Shack as ‘stranded hook up wire’ 20 or 22 gauge will work, and it is usually insulated. Strip about 3/4″ of insulation from the end of the wire. Heat the board and insert the wire in the hole. Move the wire in and out of the hole, let the solder flow into the spaces between the wire strands. Remove the wire and let the board cool. All of the solder in the wire used to be on the board. The hole in the board should be open, if not, repeat the process.

    7) Replace the battery. Be sure it is oriented just as it was before you removed it.

    Good Luck

  • Steve
    19/08/2013

    Please be aware that while this does work and restores the printer to normal functionality, it is only temporary and you will find yourself back in the same predicament in a matter of months if not weeks. I know as I’ve now “cooked” my board 3 times only to have the problem resurface each time. The formatter board overheats which triggers the “Initializing” and locks ups. What I’ve found is that the long term fix is to cut a hole in the cover over the formatter board and install an 80mm fan to keep the board cool. I used an external 110VAC to 5VDC wall transformer to power the 12V fan as it provides enough airflow to cool the board, keep the fan noise down and resolve the problem permanently. If there is doubt, try this before you cook your board or do my suggested mod…remove the cover over the formatter board and point a small desk fan blowing right on the board….I will bet that your printer will stop resetting and work normally.

  • Josh
    19/08/2013

    Wow. It worked! Totally unexpected, but it did. Amazing.

  • Thice
    28/08/2013

    @Steve
    Cutting the a hole in the cover and having to use an external transformer does not sound like a practical fix. Have you tried using a heatsink instead of the fan as well?
    I currently turn off my printer when not in use, which will lengthen the life of it as well.

  • Steve
    02/09/2013

    No…didn’t try a heat sink as unfortunately I don’t have the time to isolate what is overheating. The fix is practical to me as I had all the components laying around so it cost me nothing other than the time to cut the hole in the cover using a dremel tool and mounting the fan. I’m not able to turn mine off as it is networked and needs to be used at any time to print a document from about 5 different PC’s. There may a an on board source for power but again it boiled down to time constraints.@Thice

  • Paul
    11/09/2013

    I did not have such luck and my formatter board did not work.
    I ordered a new one at
    http://trade.alibaba.com
    CC368-60001 Formatter board for HP laserjet M1522nf printer logic board (Vivi Luo)
    for $ 75. It was prompt delivered from China and works perfect.
    Thanks for your description, without it wouldn’t be possible to repair it by myself!

  • Amy
    28/09/2013

    I made it, she is working know. i put the formatter board in oven for 8 min at 350.
    thank you very much for sharing

  • Abebe
    19/11/2013

    This is good but would have wished to cover more solutions on a wider scale.

  • Darrell Tschakert
    06/12/2013

    I have baked my formatter card twice and got it working both times. When it went bad the third time, I ordered a refurbished board. With the refurbished card I can print fine, but now I get a “Scanner Error 5 – Turn Off and On”. What do you suppose that is all about? Maybe the PC board just below the formatter board on my HP M1522nf is bad too – I think its called a modem card or a FAX card or ???? . Or, did I get another bad formatter card.

  • Derwurst
    06/12/2013

    I found this article interesting but putting a jumper over the two exposed pins on the formatter board enables the bootrom firmware to be rewritten. I just did this on a dead HP M1522 nf and after the firmware was installed I removed the jumper after power was turned off and restarting the printer everything now works as advertised. I tested it on a Windows and Mac Pro laptop and no errors

  • Roderick
    17/12/2013

    Superb. You people are the best. I put the formatter board in oven for 6 min at 350. Did everything shown on this page. I cut of half the black cover so that the board stays cool. Obviously this must be a heating issue but I am good to go now. Thank you so very much for sharing this incredible information. It works, it works, it works.

  • Gins
    18/12/2013

    Did this once in April, still working now (December of the same year). Thanks again.

  • Rob
    21/01/2014

    Followed the above instructions:
    Removed the screw from the back.
    Then popped the small latch on the bottom.

    But still can’t get the side panel off.
    The back end seems loose enough but something seems to be holding the side panel from the front.

    Any suggestions would be appreciated?

  • Michele
    26/01/2014

    Did it, it worked. THANK YOU. Even though no previous soldering experience. Just followed your instructions.
    Now have a working printer again.
    Side panel 1Xunscrew, pop whole thing (white/black side unit) left to right. Don’t try to get only black part out.
    Also, followed Rhoderick’s advice – added holes in side panel before putting it back.
    This printer has always been too hot, pages coming out a lot hotter than other Lasers. And then the formatter board is so close to the “heat”. Design issue??? As a fax machine, it is supposed to handle being ON.
    As a last comment, at 60$ I can get a new color laser. No 75$ new formatter board for me on a 4 year old 4in1. Never again a 4in1, either.
    So, let’s see how long this works!

  • Nat Miller
    13/02/2014

    @Derwurst
    What 2 exposed pins are you mentioning?

  • Matt
    19/02/2014

    Whole process took 30 minutes. Soldering the battery out and back in was surprisingly easy (I am not good at soldering anything and finding my soldering iron was the longest part of this process) Once it cooled I put it back in and it’s working. Hopefully for a long time.

    Feels good to stick it to greedy bastards that thought they could get me out to buy a new printer! Hats off to Thijs Bosschert!!

    PS – why does baking the board help the situation? The theory behind it would be interesting to me.
    Thanks again for posting.

  • Toma
    06/03/2014

    Yes Rob, the side panel is “around” the main case. Start pulling it from the back over the the jacks and continue pushing it slowly to the front.

    By the way, I followed step by step the above procedure and my 1522NF works like ca charm! I used a gas oven with mechanical thermostat but id did a great job. I used a IR thermometer to check it’s temperature before baking the formatter.

    I also upgraded it with a 125x125x25 mm cooler, powered by an old 12V 1A crashed router power supply: http://imageshack.com/a/img543/6943/eoln.jpg 🙂

    Thanks a lot for the tutorial!

  • Toma
    31/03/2014

    UPDATE: one month later, after printing ~ 50 pages, printer kept mostly turned off when not in use, cooled with an additional fan .. still died, same error. Time to order a new formatter. Shame on HP for this model.

  • Ng Leong Kee
    09/04/2014

    Fantastic good idea!

    Many thanks for your advice, I appreciate this!

    Thanks again.

  • Kelly
    17/04/2014

    I just did this procedure and it worked!! Man I am surprised. One note from my experience. I used a toaster oven and I think the heting elements were too close to the board. I melted one of the plastic plug ins. How lucky was I that it was the only one not used on the entire board. I plugged every wire back up and it was the only one unused!! Printer is working fine. Thanks for the advice!!!

  • Vlada
    11/05/2014

    It works!
    Thank you!

  • Charles
    02/06/2014

    I’m getting ready to try this process, my question is does it work if the printer is dead ? It sounds like it’s coming on but the display doesn’t light up.

  • Thice
    03/06/2014

    @Charles

    From the article:
    “Usually the problems with the formatter board will get worse over time until the moment the printer won’t do anything at all anymore.”

    So, yes.

  • Peter Houghton
    31/07/2014

    When I read this last year I was totally sceptical but decided ‘what the heck, nothing to lose.’ And hey presto it worked, until now nearly a year later. Once again I baked the board and hooray, its working once more. Thanks.

  • William
    08/08/2014

    Worked perfectly!! Thank you very much!!

  • Thice.nl » Post overview
    08/08/2014

    […] Repair a broken HP LaserJet printer by baking it iPod dock adapter for the Motorola Droid/Milestone Bypassing Apple’s Video Out protection for […]

  • John
    31/08/2014

    That worked well! Very nice 30 mins later my stuff is printing and I spent NOTHING!!!!

  • Attila
    01/10/2014

    It works! Thanks for the input! Amazing…unbelievable …the printer is back!

  • Joaquín
    07/10/2014

    Increíble pero cierto. Muchas gracias!!

  • Mark Kibble
    03/02/2015

    Wow it worked great! One thing I found is that after 8 mins the USB socket and the caps are all loose so be careful they don’t fall out. Also an unused connector on the board melted. I would suggest 6 mins is enough?

  • Alon
    14/03/2015

    Worked for me… Thanks!

  • TrippleTime
    11/05/2015

    Before you go to the trouble of baking the board, try this for a while. I removed the side panel, then removed the black plastic insert (about 8×8) from the side panel. Then re-installed just the side panel so there are openings for air. This seems to give the board more breathing room to disperse the heat. So far, my printer has been running fine for a month. Just a thought…

  • printer servicing
    11/06/2015

    I have followed the instruction and still working so far.

  • muanpuia
    24/06/2015

    great tip. heres another option, if you happen to have any scrap metal about 1×10 inch bend it to make an ‘U’ with its base around sq inch, steel ruler is a perfect piece for this purpose. Then make the U base as flat and smooth as you can and apply some heatsink compound. Attach the U base to the main square chip at the circuit board, make sure it doesn’t come in contact with any other PCB components. Then use the 2 leg of your metal U as a spring to push its base firmly and carefully close the cover. It still works for me well over a year now.

  • Thice
    26/06/2015

    @muanpuia
    It actually might make more sense to buy a couple of cheap heat sinks (http://www.dx.com/s/heat+sink) to put on the chips. That is what I ended up doing, seems to work pretty well.

  • Chris
    17/10/2015

    I did 400F for 8 minutes, let it cool for about 10 minutes and so far it’s working perfect. I loosely placed foil over the network connector to protect it from the radiant heat and only had a little melt spot that didn’t affect it any.

  • Daniel
    26/11/2015

    Hi!!!
    Thanks for this article!! In fact, it is quite difficult to find good tips about fixing printer problems via Internet!
    I have one more question and I hope you will help me. Cause I really need it! I have HP printer too and last time I have problem with making copies. The paper gets stuck at fuser! My fuser unit model is this one http://hardware.nl/fuser-unit/hp/rg5-5751-170cn-rfb.html and I wish there is any solutions for it except of buying new one!

  • P the T
    30/11/2015

    We have a bunch of these Ma522s at work. I’ve fixed about 10 so far, 350 F for 8 minutes really works! Kudos!

  • P the T
    30/11/2015

    @P the T
    (M1522s)

  • Holger
    26/03/2016

    Ich war zwar skeptisch, hatte aber nichts zu verlieren!
    Also Backpapier aufs Blech, Backofen auf ca. 200 °C vorgeheizt, Leiterplatte “formatter board” mit der Bauelementeseite nach unten aufgelegt und 8 min “backen” lassen.
    Ergebnis: Drucker funktioniert tadellos!
    Meine Vermutung: Schlechte Lötqualität beim Hersteller, die Lötstellen altern mit der Zeit.
    Der “Back”prozeß bewirkt ein Nachlöten betroffener Verbindungen.

  • Dr M Tauseef Omer
    01/04/2016

    Thank you.It resolved my issue.
    I had done the same thing 6 months back.
    but this time I did with a very HOT oven and placed it for 10 minutes. and it works nice.. Money saved 😉

  • ramzi
    10/04/2016

    its amaaaaaaaaaaaaaazing thank you very much , finaly i save a new one its work 100%

  • ramzi
    10/04/2016

    i mean that you save me to buy a new printer ………

  • waasil
    11/06/2016

    I backed up my formater board, and it ended up almost every piece on it own. The capacitors got blown up, the ICs, got un soldered, the plastic connectors all melted. I ended up buying a new one.

  • Thice
    11/06/2016

    @waasil
    It sounds like you failed to follow the instructions. You probably baked it too hot, too long or you microwaved it instead of using a oven.

  • waasil
    12/06/2016

    @ Thice,

    I backed it in an pre-warmed oven for 8 minutes at about 190C but ended up everything as I said almost on their own. I haven’t been able to attach a picture of the board in this forum otherwise I would show you how the board looks like after baking.

  • Thice
    14/10/2016

    @waasil
    Since you are the first one with this issue I think something must have gone wrong with your oven.

  • Merle
    16/10/2016

    Tried your baking fix! Worked like a charm! Don’t know for how long but it’s been 3 days now. I am running the printer with the side cover still removed to check for a heat problem but none have been discovered! Thanks again!

  • Jack
    22/03/2017

    Tried it and it WORKED! Thank you very much! I didn’t replace the small panel covering the formatter board to preent any further overheating. Very good!

Leave a Reply

Your email address will not be published. Required fields are marked *